Logo Platform Tailor ( LPT) logo software has been developed for the enterprise ERP product, the development platform is well adapted by j-platform.
Prerequisites
Java is a language that has a wide range of libraries. It should be enough to have basic java knowledge when developing applications with customization tool.
This manual assumes that developers have basic knowledge of and experience with java.
Logo Platform Tailor is an eclipse based development platform and it is expected of the participants to be familiar with eclipse IDE. Customization tool (Logo Platform Tailor) offers you the components you will need as add-ons.
Before starting to use customization tool, note that you’re expected to have knowledge of the followings:
- Basic object-oriented programming in java
- Package, class, object, class import concepts
- Public, private, static key words
- javadoc
- if- else, while, for etc. control statements
- Lists, Maps, and Iterators concepts
- Java Exceptions, try catch
- Servlets, HttpServletRequest, HttpSession objects
- WebService: Soap, Rest
- Basic SQL knowledge
- Conceptual knowledge about enterprise resource management
- Basic features of j-platform
System Requirements
LPT environment runs with the requirements given below.
JDK | 1.7 |
Memory | 2GB at least |
Disk Space | 4GB at least |
Operating System | Operating system independent |
Customization Types
Corporates may have specific and unique needs falling out of the scope of general rules. Regardless of how flexible standard ERP solutions are, they may not fully meet corporate needs. Such requirements that are left out in general solutions can be fulfilled only through customization.
Solutions that you develop with LPT can be easily integrated into j-platform.
There are two types of customizations:
- 1. Dynamic / Easy Customization
Dynamic customization is an important feature of j-platform product. It is a type of customization that you apply over the product without using LPT tool.
- 2. Customization with LPT (Logo Platform Tailor)
It refers to the customizations developed by using development platform outside the product. You can develop a new module for j-platform or you can develop integrated solutions. This training manual covers LPT and related subjects.
What is j-platform Customization Tool (LPT)?
LPT is developed by Logo Business Solutions.
It is a customization project development environment.
You can easily develop solutions to integrate into j-platform by using this environment and tools available.
LPT offers you a project development environment.
j-platform application imports and runs the project you developed in LPT.
General View
LPT is a development environment including ERP library. It is made easier for you to develop customization with a plugin set that is provided in this Eclipse based development environment. You can easily integrate your customized applications to j-platform. In sum, you can do the followings with LPT customization tool:
- New applications independent of j-platform
- Applications integrated with j-platform
- Developing new Web Services or Server Service
- Developing add-ons to server behaviors
Developing a Project
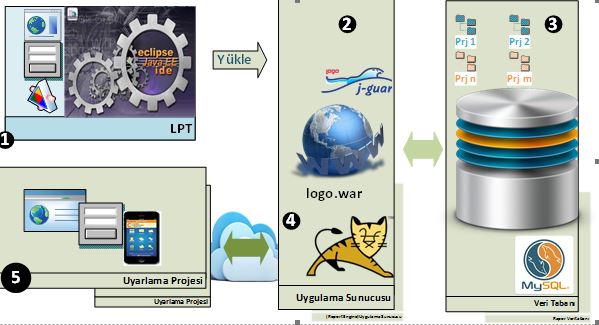
- Customization Project is developed in LPT environment and is made ready to deploy.
- The project you develop is deployed to the server with LPT interfaces. The parameters of the server where customization will be deployed should be defined in the environment numbered 1 (above). If there are multiple application servers, there may be a separate definition for each project.
- Server saves customization project to the database it is linked. Singular expression of the customization projects is kept as GUID. The related records are created in the system accordingly.
- Customization project is linked to the required user(s) or user groups through j-platform Administration. You can update tables related to the customization project in Administration tool.
- When the related user is logging in the system, the project (if there is a related customization) is deployed from the client automatically. Client and server has separate functions regarding the project.
Server loads the forms/reports and java classes having the corresponding GUID information from database. The information is sent to the client. User accesses the related form/report on the client.
LPT Client Class Loader
Client Class Loader checks its cache first upon the request it receives. If the related class has already been loaded, it loads the class without asking the server again and brings it into use. If it has not been loaded yet, it sends a request to the server with GUID and the related class information. At this point, Server Class Loader receives the request on server. If the related class of the related customization has not been loaded before by the server, the class data is retrieved from the database where customizations are kept. Then it is sent to the client. If the server has already loaded the class, it is directly sent to the client without referring to the database first. Client retrieves the class, writes to cache and then submits the class.
Tool Requirements for the Customization
You will need a set of tools when developing a customization project. This section covers basic functions that will deliver customization project development.
Customized Eclipse
To develop a customization, you basically use wizards and menus in LPT environment. You can import your customization to the system as Administrator over an active Logo web application.
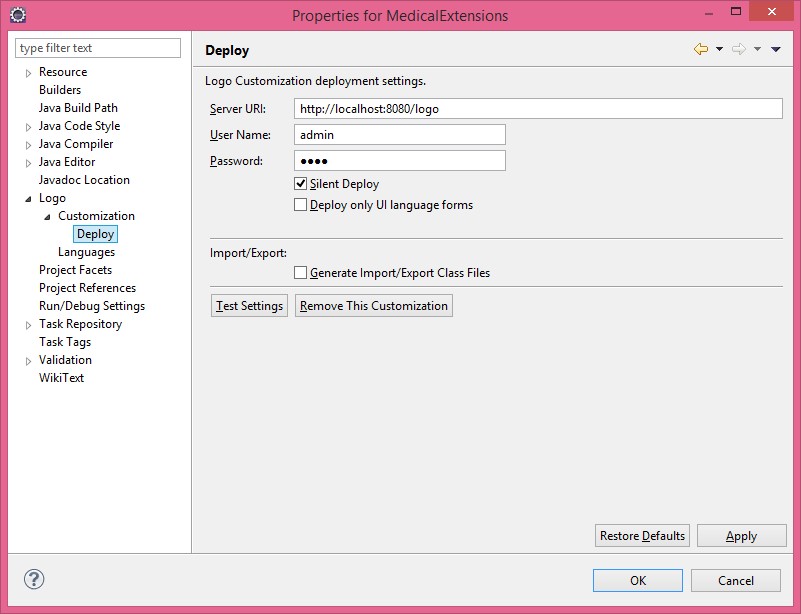
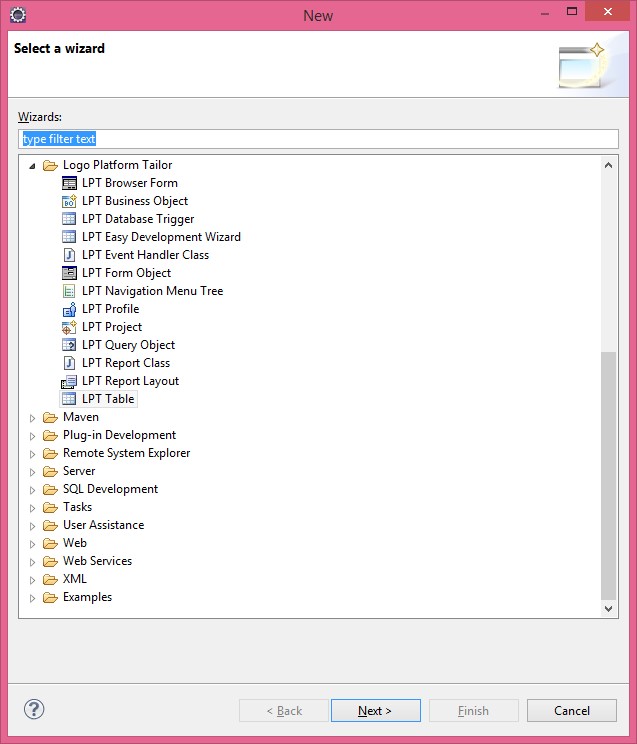
Image 1.Project Properties Image 2. Wizards
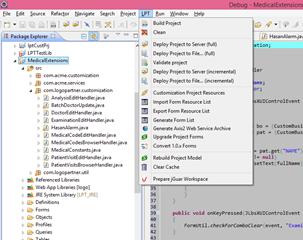
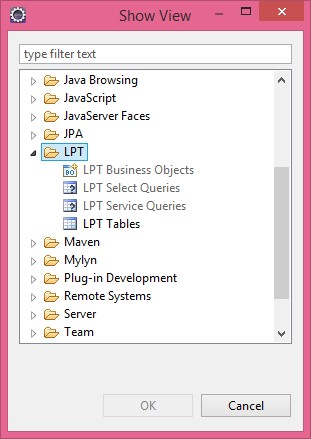
Image 3. LPT Menu Image 4. LPT View
j-platform Administrator
Your projects that are kept in system are linked to GUID. You can manage (delete, update, monitor) your projects over the system by GUID and version information. You can link your customization projects to user(s)/user group. You can update the table of your customization project in the system.
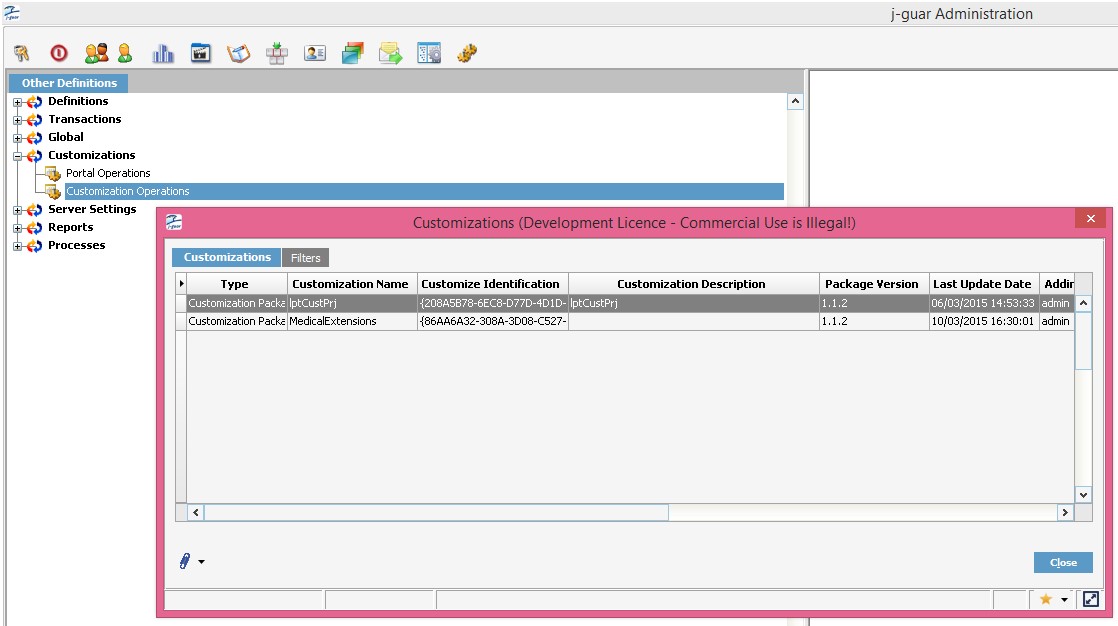
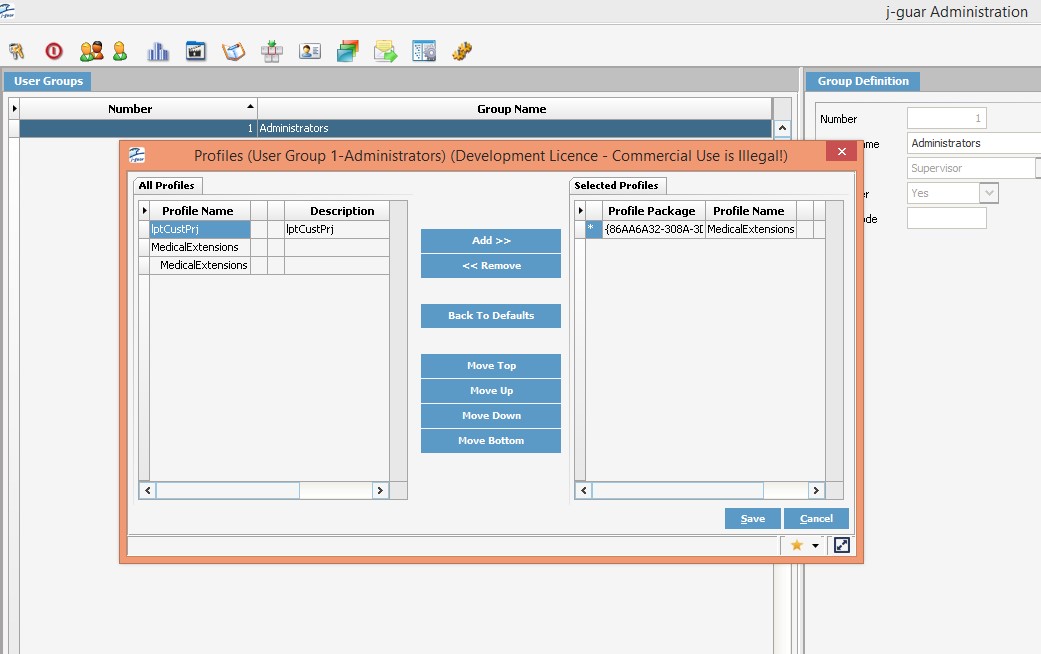
Image 5. Management of Imported Customization Projects Image 6. Management of the Connection between User and Profile
Web Applications
Applications in localhost:8080/logo/Status page are listed below.
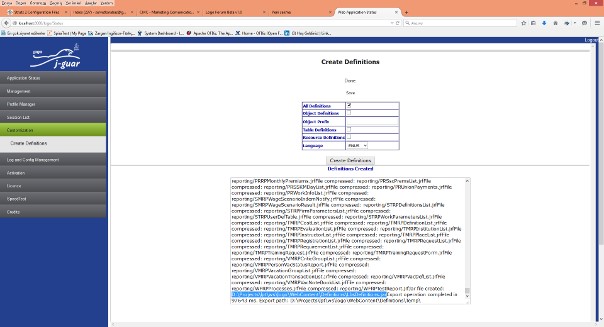
Image 7. Definitions File Generation at logo/Status Page
/Status | It opens j-platform Status portal. Status is a portal that is integrated with the application where you can perform many operations regarding product management. |
| /Activation | It opens activation portal that is used to license j-platform product. |
/services/ListServices | It opens the page where j-platform axis2 web services are listed and wsdl information can be retrieved. |
/rest/?_wadl /restservices/rest/?_wadl | It opens the page where j-platform rest web services are listed and wadl information can be retrieved. |
/smart/login | It opens the login page of j-platform. |
/smart/admin | It opens the login page of j-platform Administrator. |
/smart/sadmin | It opens the login page of j-platform Server Administrator. |
/smart/run | It runs j-platform application as an independent applet. |
LPT Installation
You need the following environments for developing and running a project.
- LPT, Eclipse based customization development
- Database
- MS SQLServer
- Oracle
- MySQL
- Server to run Logo web application
- Apache Tomcat 6x/7x
- IBM WS(It is supported; however, it is not recommended since it has not been developed.)
All components, apart from the Database, are provided as a single package in the development environment that you can download from here.
|
LPT Configuration
Initial Installation Configuration
- You download LPT Development Environment at ftp://proje.logo.com.tr/install_LPT/ and open it in the required directory.
- Install database server and create a new database.
- Find DBConnection.xml with CTRL+R in LPT environment and adjust database connection settings. If there isn’t a DBConnetion.xml file, create a copy of DBConnetion_Sample.xml as DBConnetion.xml.
- Open server view in LPT. Run Logo Web Application over Tomcat in Debug mode.
- Go to logo / status page. Run Management DB > Create/Update System Tables to create system tables.
- Or you login to ServerAdminClient application with LOGO/LOGO and create the related tables.
- Login to AdminClient (j-platform administration) application with admin/logo. Run Table Update operations on the firm. If there is no firm definition, create a firm and the related table in Administration. Set the default company for user.
j-platform application is now ready to use.
LPT Environment Update
- Backup DBConnection.xml file. System connects to database by using the parameters in this file. You can search for the file with CTRL+SHIFT+R.
Close the server running on Eclipse if any. Delete the followings completely from Eclipse > Package Explorer:
- j-platform
- Logo
- Download jguar_x.ear file from ftp site. Import the file with Import > Ear in LPT environment.
- Remove backup DBConnection.xml file.
- Make sure that Logo.war is added to Tomcat.
- Update system tables in Server Admin.
- Update firm tables in Administrator.
- Create lbsDefinition.jar at logo / status page.
- Update LPT plugins.
- Run Eclipse > Project > Clean & Refresh > Build.
- If Logo application is not available under Servers View > Tomcat 6x/7x, add Logo application.
We recommend that you update LPT environment after every version upgrade.
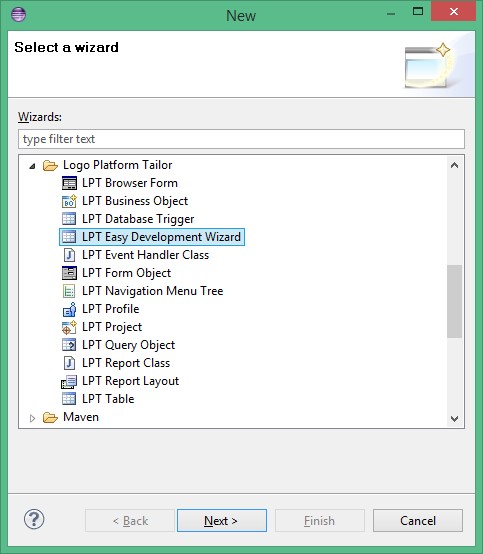
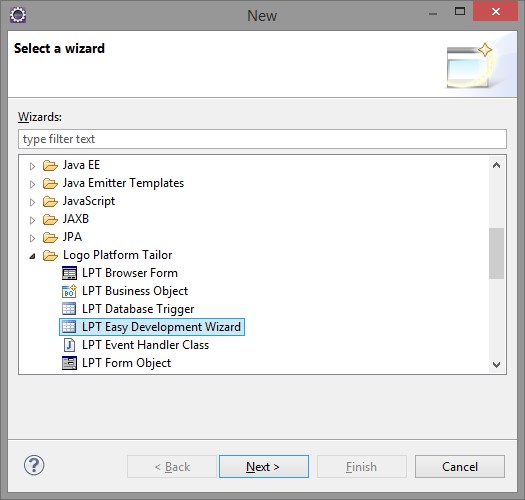
Wizards
Open Wizards page (shown to the right) with CTRL+N in Eclipse or right click Project Explorer in Eclipse and select New > Other.
You see the tools you can use when developing a Logo Platform Tailor project in this page.
The tools given in this page usually consist of windows with several steps.
All wizards will be mentioned respectively.
LPT Browser Form
Browser form is one of the basic objects of the product.
Browser form allows you to manage the list that is the result of the query object.
Reminder: You establish the connection between Query Object and Browser Form here. Before creating the browser form, it is important that Query Object has already been created.

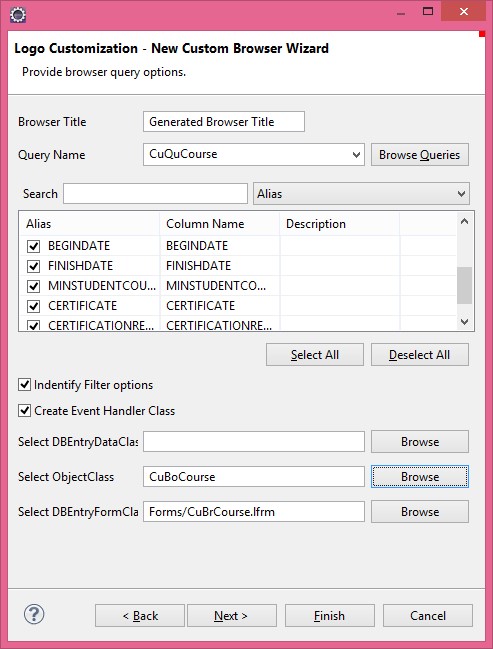
Browser Form Query Options
Browser Title The heading of the form.
Query Name It selects an existing query object.
Identity Filter Options You can check this option to designate that you want to set filter options. Depending on your selection, the related filter window will open later.
Create Event Handler Class It creates handler class of the form.
DB Entry Data Class It is a business object used to add / edit records for the browser.
Object Class Business object related to each record.
DB Entry Form Class It is a form object used to add / edit records for the browser.
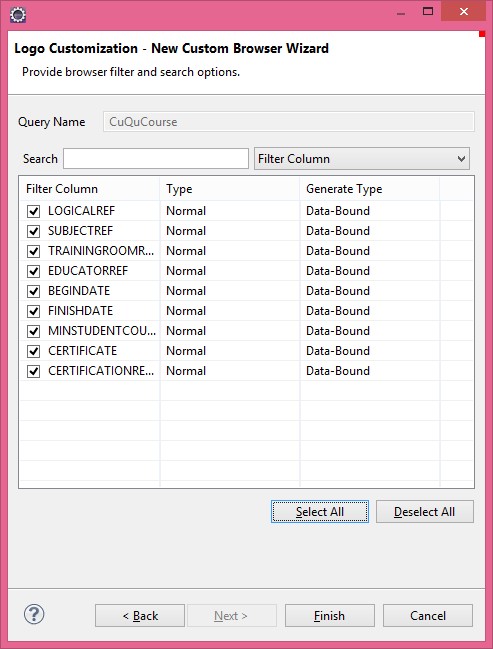
Check the columns that will be filtered and displayed in the filter column of the Browser form. Then select filtering type. Filtering options are:
- Normal
- Range
- List Selection
- Group Selection
Browser Handler Class Generation
Event handler class of the Browser is created in this window.
After entering the necessary fields, click Finish.
LPT Business Object
Before creating data entry forms, you need to create Custom Business Object to perform CRUD operations.
Business Objects are data types acting as the communicator between database management system and forms. It performs changes related to the Custom Business Object in database after data entry, update or delete operation and it shows actual data on the form.
You link Business objects to tables when creating them.
To open this wizard, select LPT Business Object from LPT Wizard.
Template Business Object Selection
Customization business object can extend the business object in the product. When creating a custom business object, the first window that opens is where you select the template.
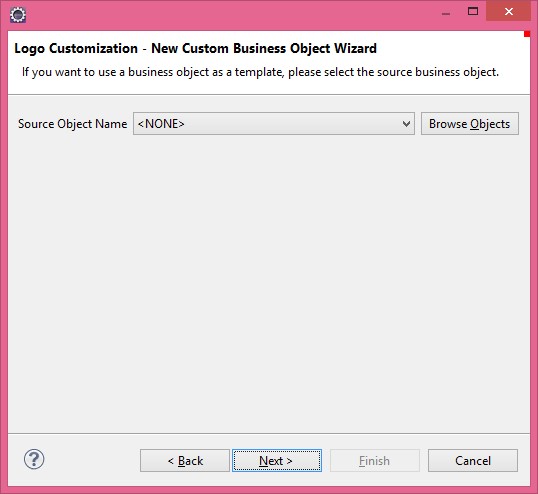
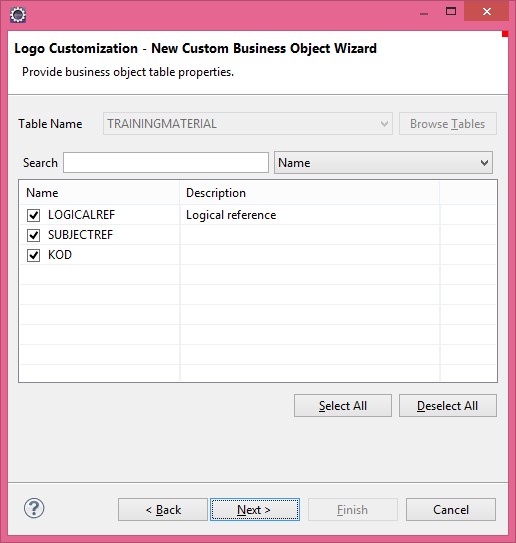
Table Selection
If no Template has been selected, the related table is selected. Table fields are listed so you can select the required fields for the business object.
Business Object Extension Selection
The extension of a custom business object cannot be Custom Business Object.
The business objects that are defined in the product are listed in this table. If a BO should have an extension, you can make your selection in this window. Otherwise, simply select <NONE> option and click Finish button.
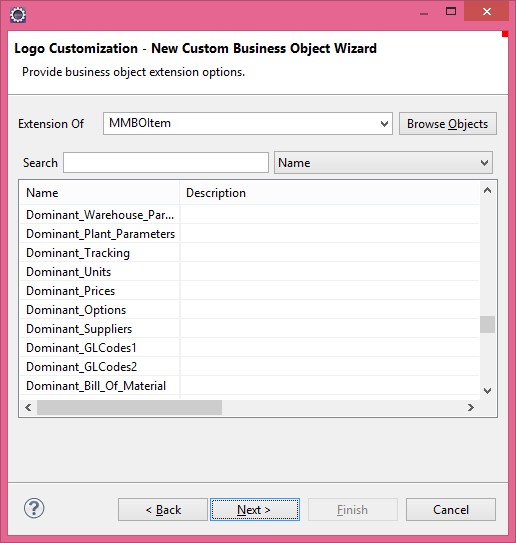
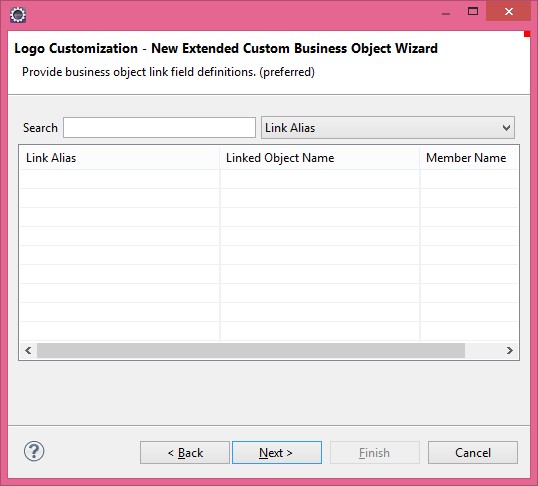
Table Link Definition
You can define a link by using the links in the table of the Business Object.
You can also define a new link by right clicking in this window.
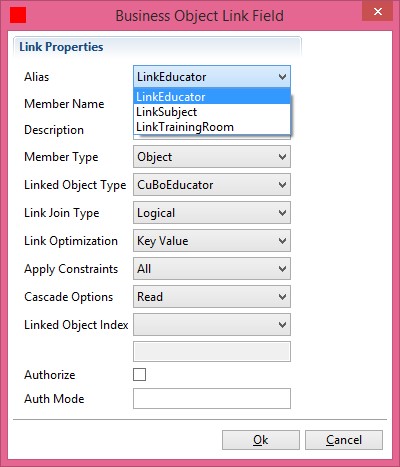
Business Object Table Link Definition
Alias | The name of the table link. |
Member Name | The singular name of the link. |
Description | Information about the link. |
Member Type | Link relation type can be selected either as “Object” or “Collection”. |
Linked Object Type | Defines the type of the business object to link. |
Link Join Type | Defines the type of Join operation. The options are “Logical”, “Inner” and “Outer”. |
Apply Constraints | You designate whether constraints will be applied. |
Cascade Options | It designates the restriction for use of the link object. (Read, Update or Delete) |
Link Object Index | Index that will be used during the operation. |
Authorize and Auth Mode | Designates whether the link definition will be used in the authorization mechanism of the application and in Authorization mode. |
Business Object Link Definition
Business objects are linked directly. The links between tables are not used.
This method is not recommended due to performance issues.

Business Object Link Fields
Member Name | The singular name of the link. |
Description | Information about the link. |
Member Type | Select either “Object” or “Collection”. |
Linked Object Type | Defines the type of the BO to link. |
Cascade Options | Select Read, Read & Update or Read & Update & Delete. |
Link Object Index | Select the index of the object that is linked. |
Link Condition | Enter link condition. |
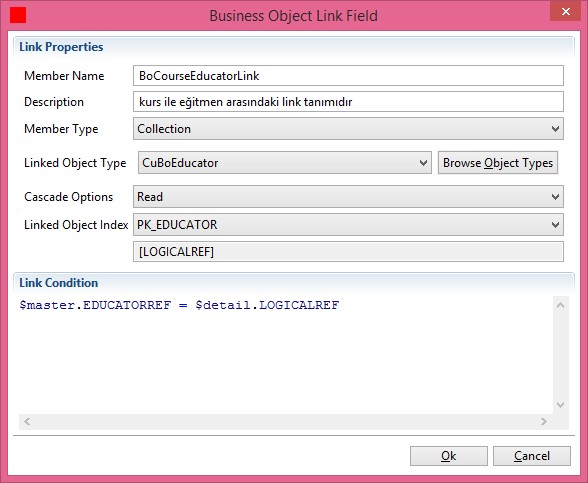
Reminder: You should prefer to establish the link between tables.
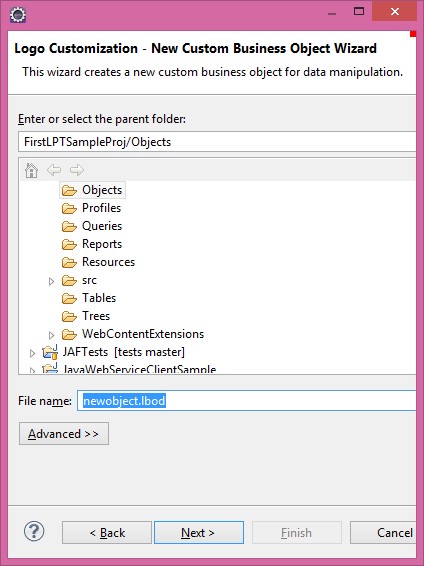
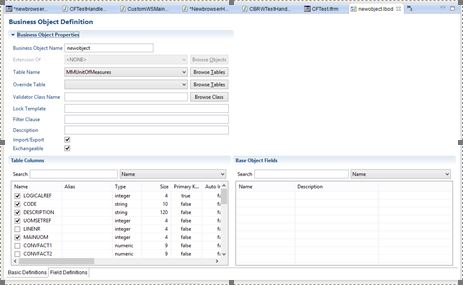
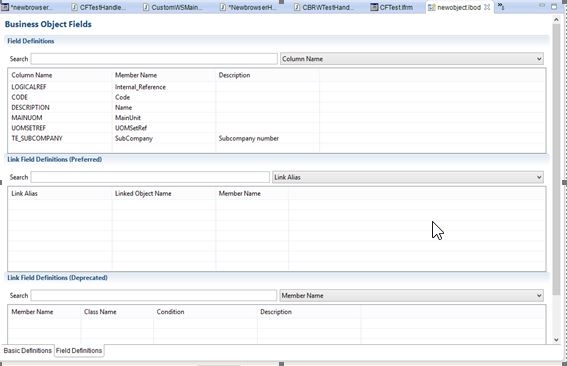
A file with lbod extension is created under Object directory.
You can easily change the parameters of the business object definition in Business Object Definition window below.
Detailed information will be provided about Design Windows later in the document.
LPT Database Trigger
A trigger is a special type of stored procedure. It runs automatically in case of an event in a table or a view in the database server. Triggers are mostly used to maintain database integrity.
Creating a Database Trigger
Triggers run in tables depending on INSERT, UPDATE or DELETE operations.
You can create three types of trigger.
- Base Trigger: Firm or period independent.
- Firm Trigger: Firm dependent.
- Period Trigger: Period dependent.
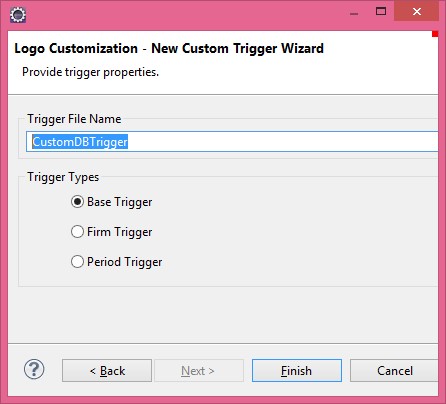
Trigger File
A file named Trigger File Name is created under the related directory. You can write the relevant database independent trigger statements in this file.
Triggers you define are stored with a GUID value.
Trigger statements that are written in Logo description language are created over j-platform administration in compliance with the database that is selected when performing database update for the customization.
Below is an example of a trigger to be fired after Delete operation.
  TRIGGER name { BEFORE | AFTER
  | ON } { DELETE | INSERT | UPDATE} tableName

  VAR
  BEGIN
  END;

  TRIGGER TRGNAME1 ON DELETE TABLE

  VAR
        p_reference INTEGER;
        p_refcount INTEGER;
  BEGIN
         p_reference := :OLD.IDENTITY_COLUMN;
         SELECT REFCOUNT INTO p_refcount FROM TABLEREF WHERE RECORDLREF = p_reference;
         IF (p_refcount > 0) THEN
               RAISERROR('Cannot delete since references to record exists:(TABLE, ' + p_reference + ')');
         END;
  END;
  TRIGGER X_$V(firm)GOSMTPSERVERSBD ON DELETE S_SMTPSERVERS
  VAR
         p_refcount INTEGER;
         p_ErrMsg STRING[150];
         p_LOGICALREF INTEGER;
  BEGIN
         p_reference := :OLD.LOGICALREF;
         p_domainid := :OLD.TE_DOMAINID;
         p_LOGICALREF := :OLD.LOGICALREF;

         SELECT COUNT(LOGICALREF) INTO p_refcount FROM S_USERS WHERE (SMTPSERVERREF=p_LOGICALREF) AND TE_DOMAINID = p_domainid;
         IF (p_refcount > 0) THEN
               p_ErrMsg := 'Cannot delete since references to record exists:(S_SMTPSERVERS, ' || TO_CHAR(p_reference,10) || ') from S_USERS';
               RAISERROR(p_ErrMsg);
         END;
  END;
  TRIGGER X_$V(firm)PMITEMLINEBD ON DELETE U_$V(firm)_PMITEMLINE

  VAR
         p_refcount INTEGER;
         p_reference INTEGER;
         p_ErrMsg STRING[150];
         p_LOGICALREF INTEGER;
  BEGIN
         p_reference := :OLD.LOGICALREF;
         p_LOGICALREF := :OLD.LOGICALREF;
         SELECT COUNT(LOGICALREF) INTO p_refcount FROM U_$V(firm)_PMBOMRVATRASGS WHERE LINKRVLNREF = p_LOGICALREF;
         IF (p_refcount > 0) THEN
               p_ErrMsg := 'Cannot delete since references to record
  exists:(U_$V(firm)_PMITEMLINE, ' || TO_CHAR(p_reference,10) || ') from U_$V(firm)_PMBOMRVATRASGS';
               RAISERROR(p_ErrMsg);

         END;

  END;

  TRIGGER GOPRODUCTGROUPSBD ON DELETE S_PRODUCTGROUPS

  VAR
         p_refcount INTEGER;
         p_reference INTEGER;
         p_ErrMsg STRING[150];
         p_domainid INTEGER;
         p_LOGICALREF INTEGER;
  BEGIN
         p_reference := :OLD.LOGICALREF;
         p_domainid := :OLD.TE_DOMAINID;
         p_LOGICALREF := :OLD.LOGICALREF;
         SELECT COUNT(LOGICALREF) INTO p_refcount FROM S_PRODUCTVERSIONS WHERE GROUPREF = p_LOGICALREF;
         IF (p_refcount > 0) THE
               p_ErrMsg := 'Cannot delete since references to record exists:(S_PRODUCTGROUPS, ' || TO_CHAR(p_reference,10) || ') from S_PRODUCTVERSIONS';
               RAISERROR(p_ErrMsg);
         END;

  END;
LPT Easy Development Wizard
It does not create a file like the other wizards do. It will have you develop the following wizards easily by running them in an order.
- Table
- Business Object
- Query form
- Browser and Form
If you attempt to develop a customization project in a similar manner to the product standards, it will offer significant facilities during the development phase.
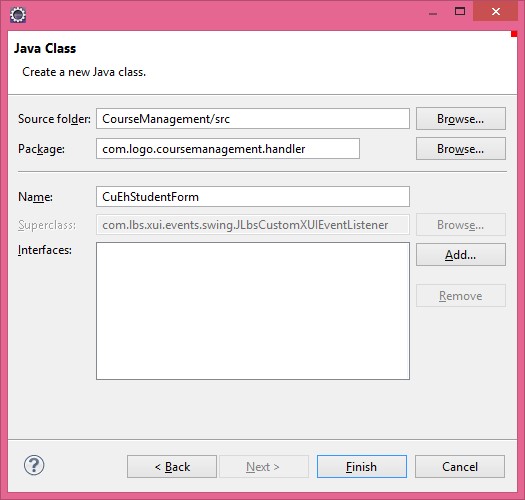
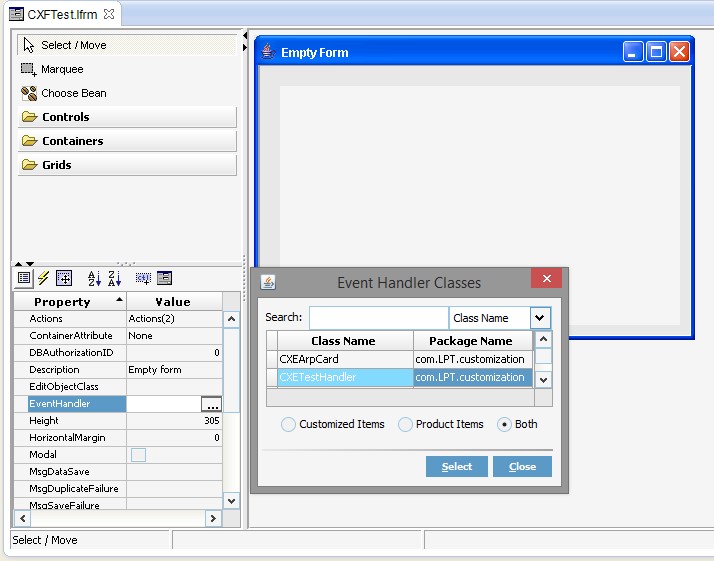
LPT Event Handler Class
It is the handler class of form events.
The structure that will run when clicked on a button or after any action taken while initializing the form is defined in this window.
You can associate forms either automatically when creating Handler Classes forms, or you can associate them manually later.
- Table
- Business Object
- Query form
- Browser and Form
If you attempt to develop a customization project in a similar manner to the product standards, it will offer significant facilities during the development phase.
LPT Event Handler Class
It is the handler class of form events.
The structure that will run when clicked on a button or after any action taken while initializing the form is defined in this window.
You can associate forms either automatically when creating Handler Classes forms, or you can associate them manually later.
import
com.lbs.xui.events.swing.JLbsCustomXUIEventListener;

public class CustomEventHandler extends JLbsCustomXUIEventListener {
        public void onFormInitialize(JLbsXUIControlEvent  event)
        {
        }
        public void onClickxButton(JLbsXUIControlEvent  event)
        {
        }

}
/**
* Search for onverifyCOntrolValue in combobox
* Open Lookup using comboedit from Event Handler
*/
public void onPersonLookup(JLbsXUIControlEvent event)
{
JLbsXUIPane container = event.getContainer();
JLbsXUILookupInfo info = new JLbsXUILookupInfo();
info.setQueryTerms(new String[] { "T4" });
info.setParameter("PersonCode",getPersonCode());
info.setQueryParamValue("P_CARDREF",new Integer(getPersonRef()));
CustomBusinessObject LCBO = (CustomBusinessObject) container.getData();
container.openChild("EMXFPersonCardBrowser.jfm", info, true,JLbsXUITypes.XUIMODE_DBSELECT);
if (info.getResult() == JLbsXUILookupInfo.XUILU_OK)
{
int L_Ref = info.getIntegerData("Reference");
ProjectUtil.setMemberValue(LCBO,"PERSONREF",new Integer(L_Ref));
ProjectUtil.setMemberValue(LCBO,"PersonLink.Code",info.getStringData("Code"));
ProjectUtil.setMemberValue(LCBO,"PersonLink.TitleInfo.Code",info.getStringData("TitleInfoCode"));
// used for setting all component values inside the tag-given component
container.resetChildValuesByTag(5);
// set return to boolean
event.setReturnObject(Boolean.TRUE);
} else {
event.setReturnObject(Boolean.FALSE);
}
}public class CFCourseSlipHandler {
public CFCourseSlipHandler() {
}
/*
* Browser formunda SaveData butonuna
basıldığında çalışacak hadler.
*/
public void onSaveData(JLbsXUIControlEvent event)
{
CustomBusinessObject formData = (CustomBusinessObject) event.getData();
String className = (String) ProjectUtil.getMemberValue(formData, "ClassLink.ClassName");
if(StringUtil.isEmpty(className))
{
event.setReturnObject(false);
ProjectUtil.warn(event, "Sınıf adı boş");
}
}
}LPT Form Object
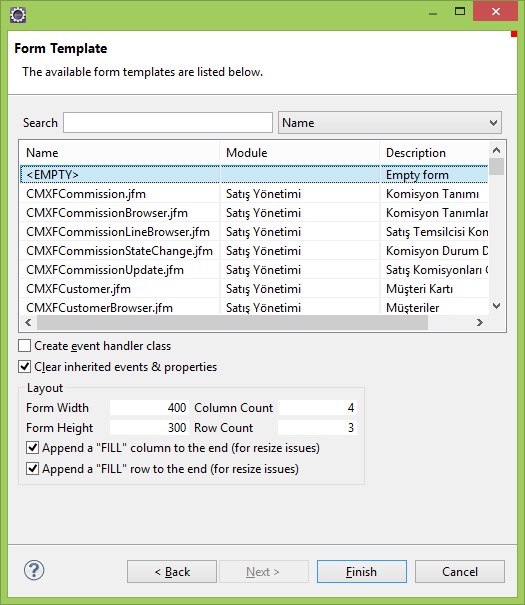
Select LPT Form in Wizard selection window. Create the file with lfrm extension under Forms directory.
Form files are a form of XML files that are serialized and written and contain the components and properties in window design.
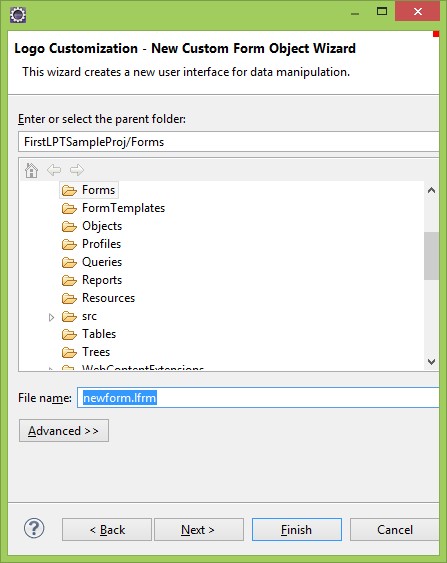
Create Event Handler Class option creates handler class under src. If you want to create an event handler class for an empty or a template form, check Create Event Handler class option and click Finish button.
Select <EMPTY> option in Form Templates list, and then click Next button.
Warning: If you select one of the form templates, custom form will have the event handler class of the selected template form. If you do not want to use the event handler class of the template form, check Clear Inherited events and properties option.
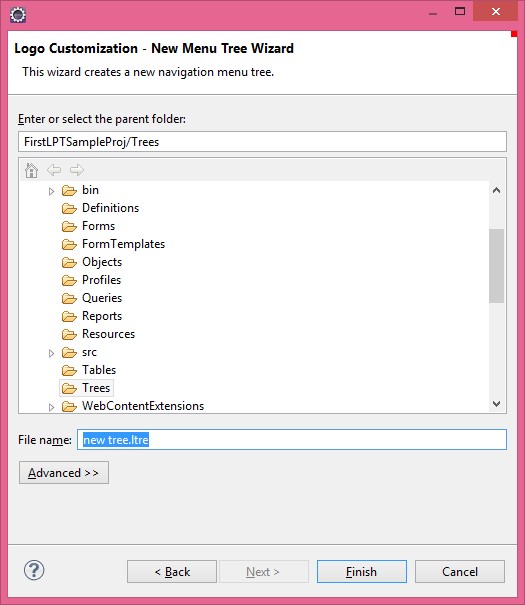
LPT Navigation Menu Tree
Navigation Menu Tree is one of the basic components in the product. Browsers, Forms and Reports can be added to the navigation tree as a module or they can be removed.
Navigation tree is created under the Trees directory with ltre extension. This file can be easily customized by using the Editor in LPT environment. You can add/remove the existing modules, forms etc. You can create a new module and add the forms that you created for the customization under this module.
Reminder: Note that in order to have this navigation tree displayed in the product, you must associate it with a profile and then add this profile to the relevant user/user group.
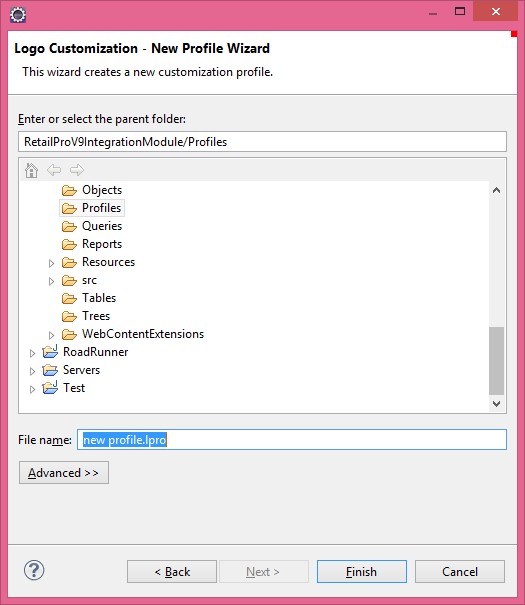
LPT Profile
You must create a Profile to associate your customization project with the product. You can define different profiles in line with the user roles.
LPT profile wizard creates a user profile under the Profiles directory. You associate profiles with navigation menu tree in profile design window.
LPT Project
It is the first operation step to take after LPT installation. This wizard creates LPT project and the related directory and files in the project name you designated.
The files you created with the other LPT wizards will be moved automatically under the related directories.
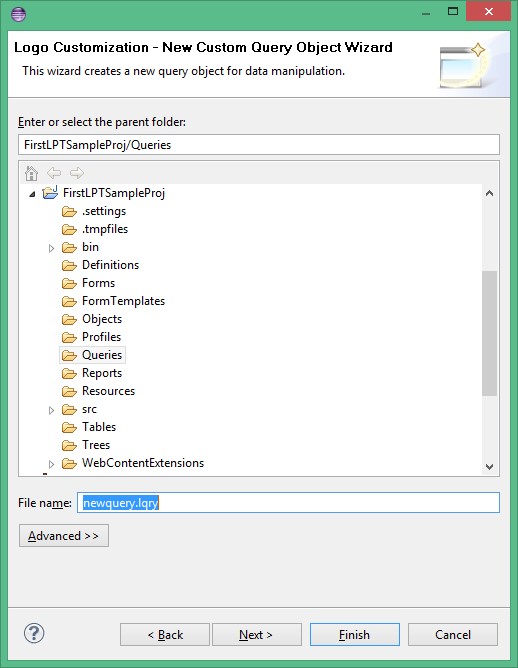
LPT Query Object
Query Object File Name
Query objects are used to define dynamic views in certain table sets.
Views that you create with query objects can contain a single table or several tables joined with complex conditions.
Parameters and dynamic restriction conditions allows you to use a query definition for many purposes.
If you want to create a query with a default parameter, you can click Finish button directly.
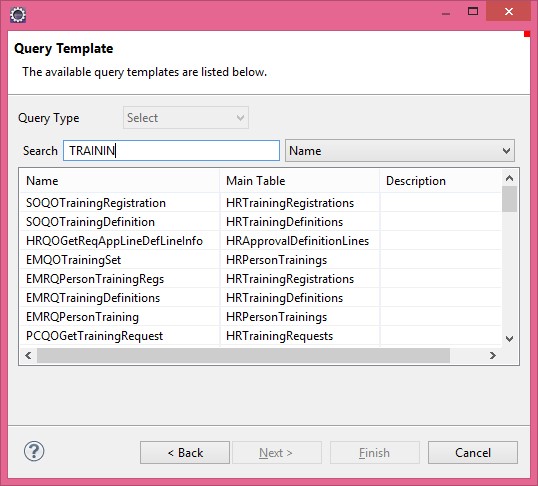
Query Template
You’ll be prompt to enter query type in this page. Insert, Update, Delete and Select query types are supported in query definitions. You can create a new query by changing Query Type or you can create an advanced query from template.
Select Query Type as Select. You can select any query that you want as the main template. Template content is copied to the new query definition.
In this example, we select <EMPTY> line in template list to create a new query of Select type.
Query Links
You define query and table object links in this window.
Table Links (Preferred):
It is not recommended to define links between tables in terms of architecture.
Query Links:
You can add records according to Alias and link condition values.
You can update information you enter in this window later in Query Object Definition design window that opens by double clicking on the Query Object.
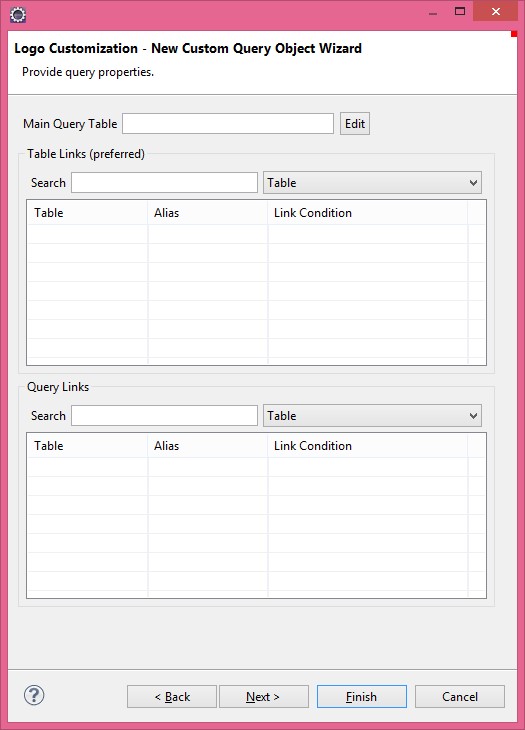
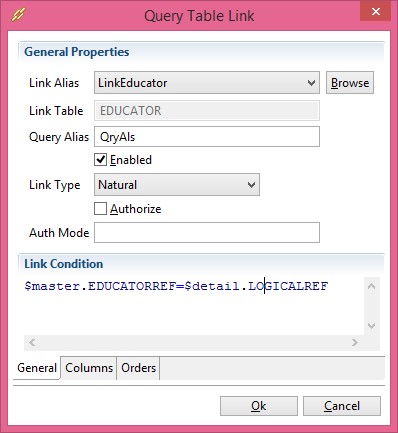
Table Link Definition
Link Alias | You can select links defined in the selected table. |
Link Table | The name of the table associated with the link. |
Query Alias | The name that you give to this link. |
Link Type | Indicates the link type. The options are Natural, Left Inner, Left Outer and Right Outer. |
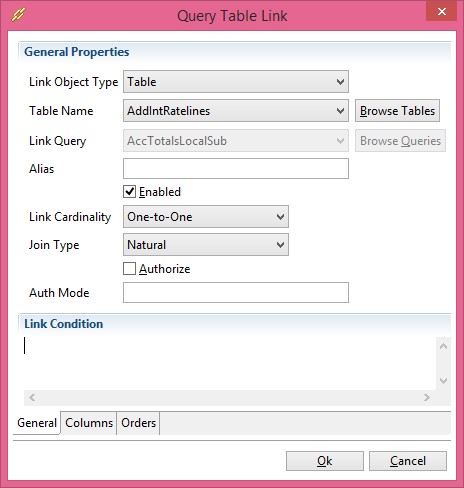
Query Link Definition
Link Object Type designates whether the link definition will be made with tables or queries.
Depending on your selection Link Object Type field, Table Name or Link Query fields will be active.
You select Link Cardinality either as One-to-One or One-to-Many.
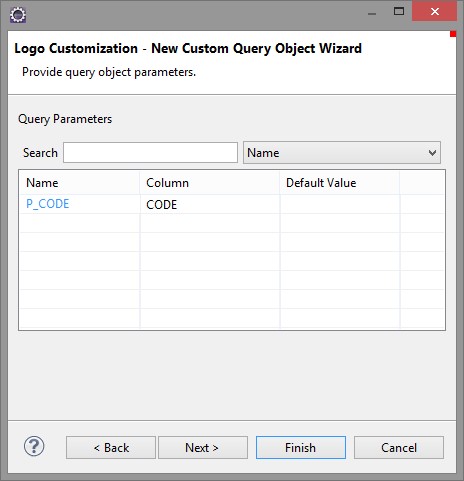
Query Parameter Definitions
You define parameters to use in Condition statement.
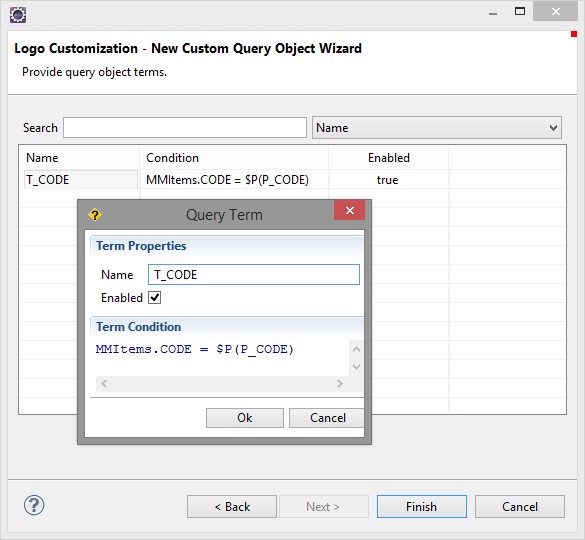
Query Condition Definitions
It is used to create condition statement of the query object.
Logo Custom Query Tester option tests the query object that you created. Go to Eclipse > Package Explorer, right click on the relevant query object and click Logo Custom Query Tester option.
LPT Report Class
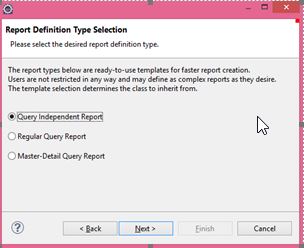
Report Definition Type Selection
It offers sample templates to create quick reports. User is never restricted for the reports.
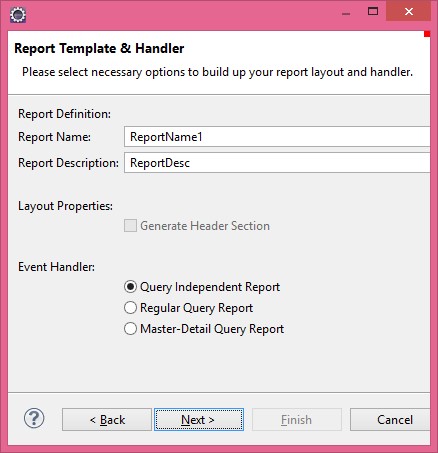
Query Independent Report | Select this option to create query independent reports. |
Regular Query Report | It is used for general reports. This report has a single query. |
Master Detail Query Report | Select this option for reports with two queries. |
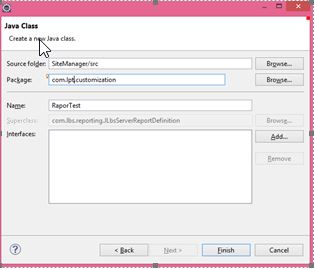
Report Class
Java file is created under the related package with the class name you designate.
Depending on the template that you will select in the next window, a window will appear for you to select the main or detail queries.
LPT Report Layout
You can use LPT Report Layout to create a custom report.
LPT Report Layout Wizard Selection
Create a new Custom Report Layout.
Click File > New > Other option and select Logo Customization Wizards > LPT Report Layout. Click Next button.
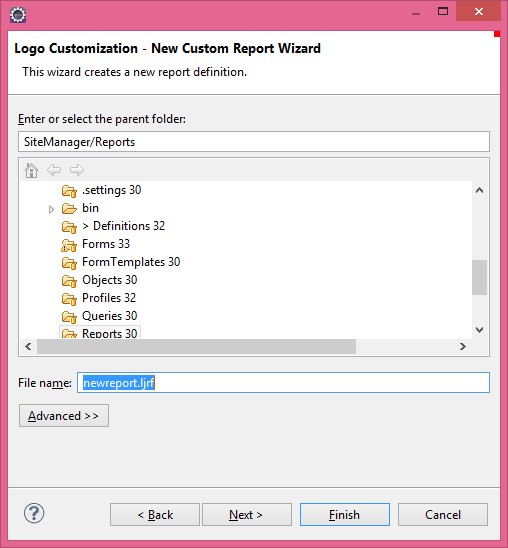
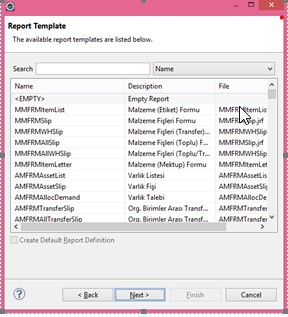
Report Template
Enter PatientList.ljrf as the file name and click Next button.
Create Default Report Definition: If this option is checked, you do not select report definition type in the next window.
The existing form templates of j-platform application are listed.
Select <EMPTY> option in the report templates list and click Next button.
Report Template and Handler
Report definition is made by entering general heading and selecting Event Handler in this window.
You select the required fields for the report
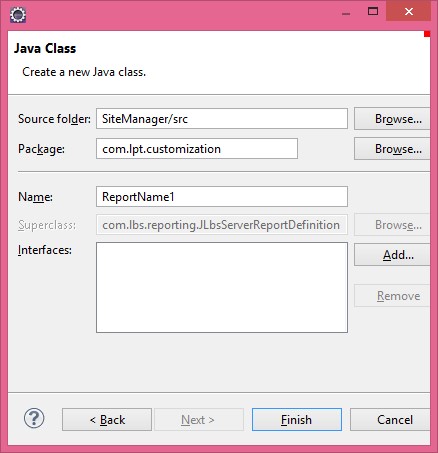
Report Class
You create event handler class for the report definition in this window.
Name: It is assigned automatically from the previous page. You can change it if necessary.
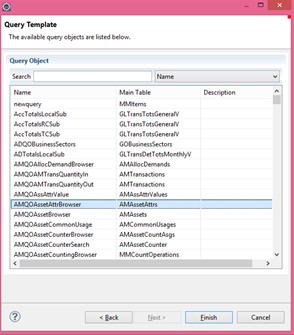
Query Template
Select the query that will run for the report. Then click Finish button.
If user selects Empty Report Template, a report with a single section, as in the below image, is created.

LPT Table
Custom Table Wizard
File Name You designate only the file name here. Table name is entered in the next window
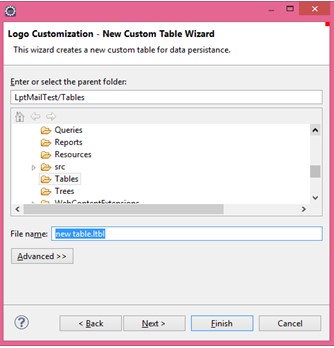
Table Field Definitions
Table Name | The name of the table that will be used for the application. |
Physical Name | The name of the table that will be created in database. |
Name Parameters | It keeps information of whether the table is firm and/or period table. |
Record Info Column | It indicates whether table or record information will be added. |
LOGICALREF is the primary key column in all tables. It is created automatically.
You can easily add table fields by right clicking on the grid.

Table Index Definitions
It allows you to run a quick research.
Suffix | Enter suffix. |
Name | Index name. |
Segments | You can select more than one table field. |
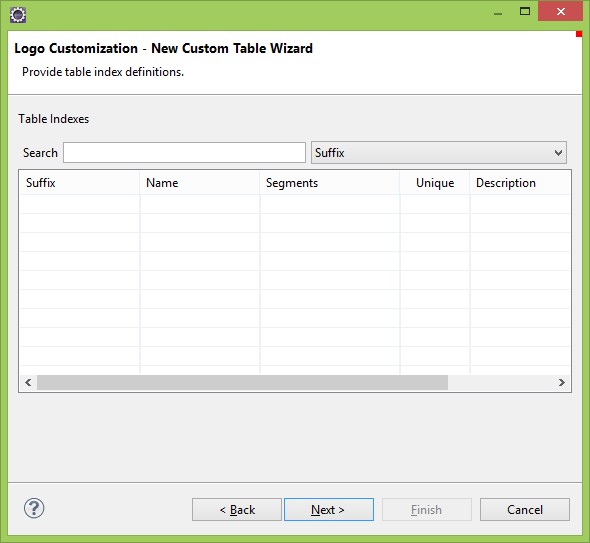
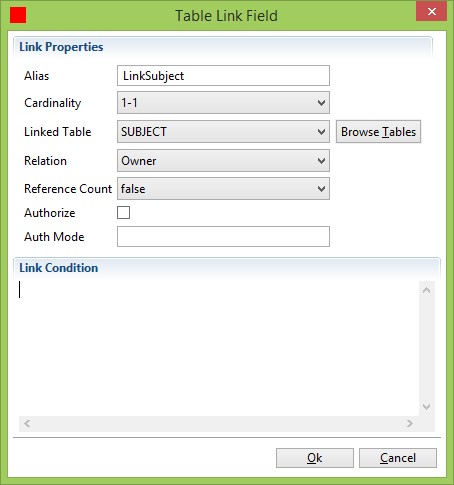
Table Link Fields
Alias | The name of the table link. Link that you define here will be used in objects and queries later. |
Cardinality | Defines how each table is linked to another. The options are 1-1 (One to one) and 1-N (One to many). |
Linked Table | You select the other table to link. |
Relation | Defines the relation between the tables. The options are Owner and Reference. |
Reference Count | If you want to run Reference Count for this link, set it to True. |
Authorize | This checkbox is used to designate whether the link is within the scope of authorization mechanism. If checked, you define link mode with Auth Mode option. |
Auth Mode | The definition of authorization mode. |
Link Condition | You define link condition in this field. A Helper menu opens with CTRL+Space key combination. |
LPT Editor Windows
Editor screens that are provided in development environment are one of the crucial features of LPT. LPT offers advanced editors for the customization files you create.
When double clicked on the files you created by using wizards, LPT automatically opens editors according to the related file types.
Each editor has its own abilities.
Form Editor Screen
When double clicked on the project file, form editor window opens.
You can select form objects from Outline window or over the form design. The fields in Property window change according to the selected object. You can figure out these fields by their name. This manual will focus on the significant fields only.

Outline View Window
The objects in the form can be displayed and selected hierarchically. It will make your work easier if you use it in screen design.
Object Pallet
You drag and drop the required objects on the form.
Property Window
You can manage the properties of the selected object.
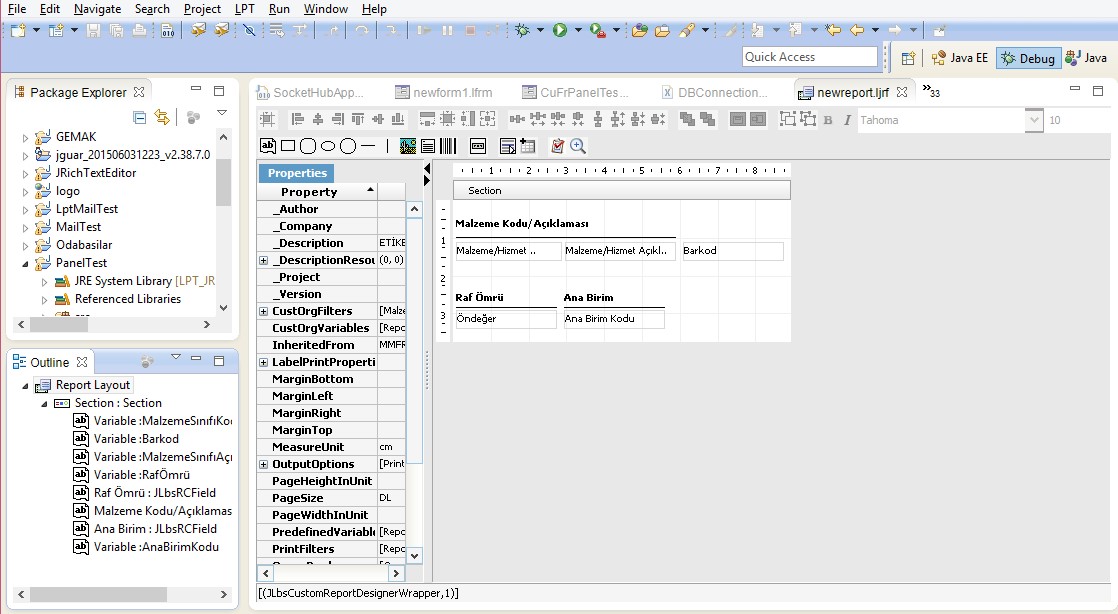
Report Editor Screen
Double click on the report object to open Report Editor window.
Outline View Window
All objects in the form are displayed here hierarchically.
Properties Panel
A report consists of one or more sections and each section has a property window. When you select a section, you can see the properties of that section. You can manage the properties of all objects in this window. Some of the significant properties are given below:
Caption: It is the heading of the report. It is shown in the report template; however, it is not displayed when you run the report.
Section ID: It is the singular ID of the section. The data that returns from the query is sent to this ID in the report class.
Query Editor Screen
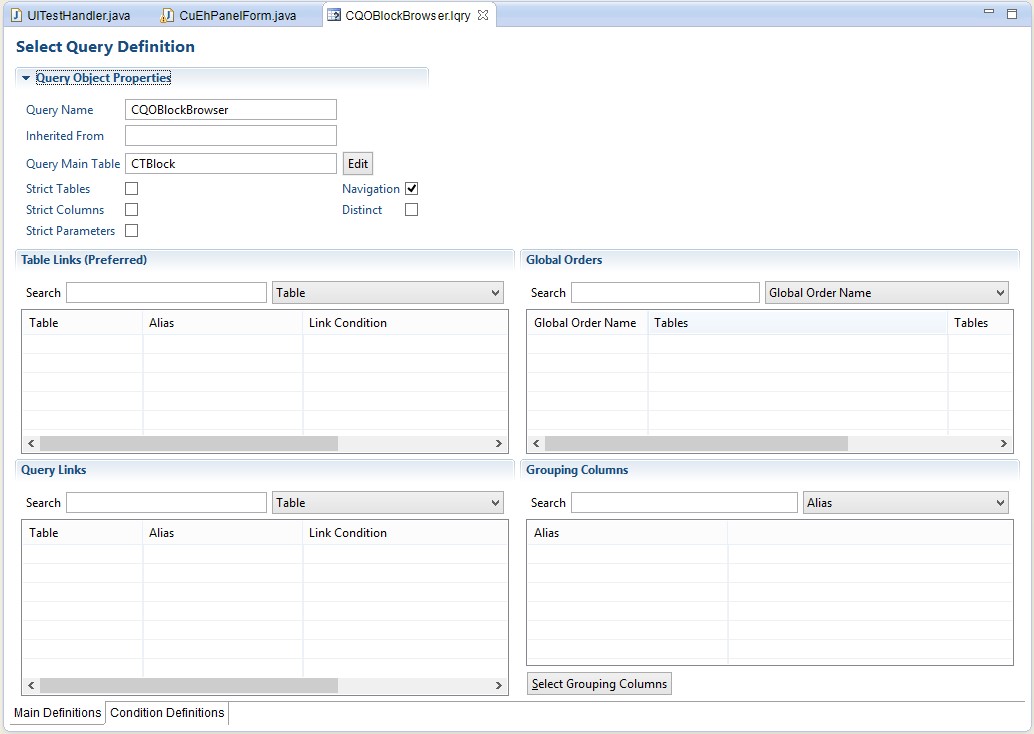
Query Object Properties Fields | |
Query Name | It is the name of the query. By default, it has the same name as the related query file. |
Inherited From | It is the main query from which the query is inherited. It is read-only. |
Query Main Table | It is the main table definition made for the query. Click Edit to add query main table. |
Strict Tables Strict Columns Strict Parameters | “Strict” key word indicates an obligation. If Strict tables option is checked, the name you enter in Table Name field is searched as is in database. For instance, let’s assume table name is $V{firm}_ITEMS. If Strict Tables option is checked, it will search for the specified table name in database and if it cannot be found, system gives error. If Strict Tables option is NOT checked, it searches through the database by giving the necessary values in place of “firm” in run time. This case does not apply for other features starting with Strict. Strict Tables option also applies for the table names in table links. |
Navigation | When checked, it supports query navigation, meaning that returning result set can be transversed. This option is checked by default. Browser queries must be navigational |
Distinct | When checked, query is distinct. It is not checked by default. |
Table Links (Preferred)
This section is used to add a new table link. The main table is mandatory to create a custom query object. It can be added to the main table later by designating the link conditions in other tables that are used in the query.
LPT Table Editor Screen
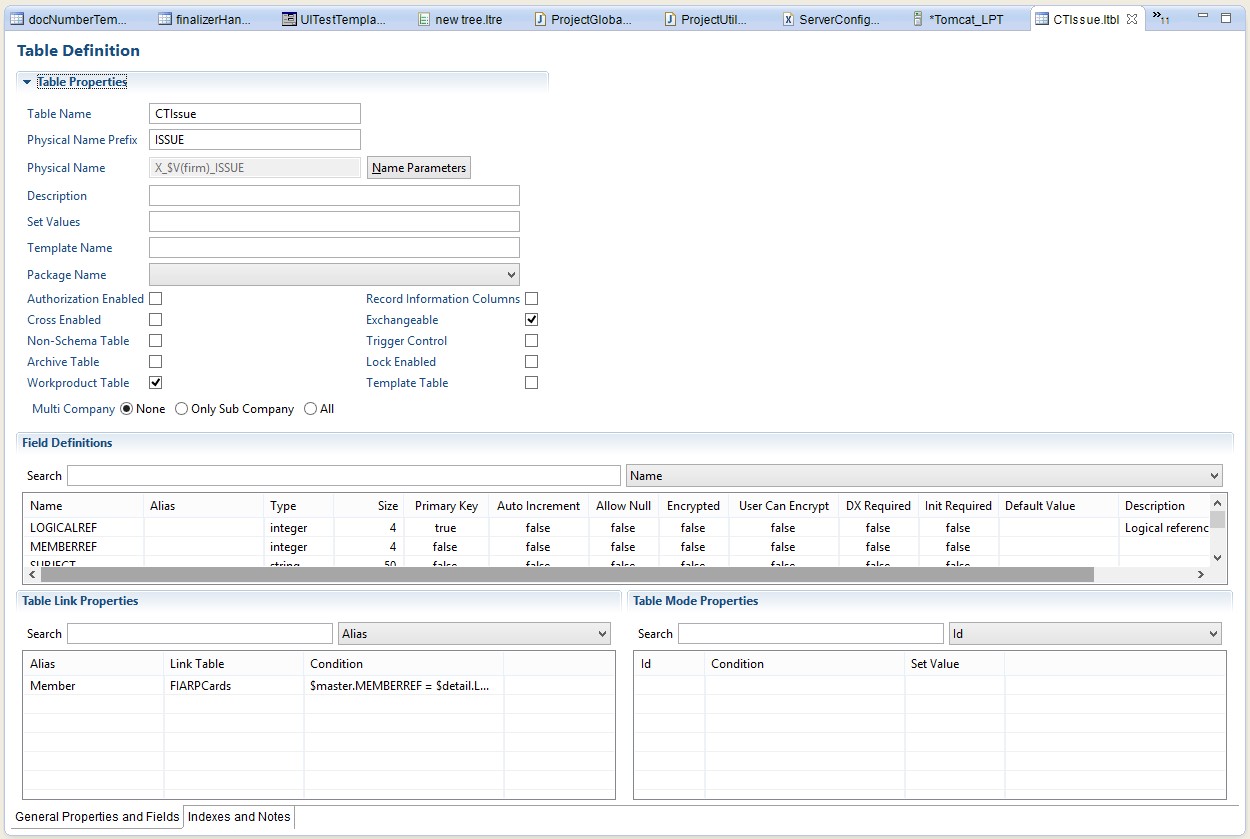
Double click on the table from LPT project or right click > click Open and select LPT Table Editor. You can view and change all values that you enter when creating the table. This screen has two tabs:
General Properties and Fields
- Physical Name
- Physical Name Prefix
- Table Name and other parameters can be changed in this window.
Name parameters indicate the scope of data that will be stored in the table. If table field contains a company number, a new table will be created for each firm and each firm table will have its own content.
See the table below for further information:
Physical Table Prefix | Name Options | Definition |
Country | (None) | Country definitions can be shared between firms. Since data is global, there is no need for a name variant. |
Material | firm | Each company has its own material definitions. Therefore, name variant is added to firm name as variant. |
Sales Orders | firm, period | Each company has sales orders of the fiscal year and these orders are period dependent. Therefore, name variant is inclusive of both the firm and the period. |
Physical Name | It indicates the Physical Name of the table that will be used in database. The name you enter in this field must comply with the rules for naming database tables. It should not be one of the database reserved words. (Each database system has its own reserved words lists that you can search in the internet.) Physical name should be unique in the database, meaning that you cannot use the same name for two tables. This name should not be too long either. Database systems restrict the character limit for table names. Physical name of a table can be a maximum of 27 characters in Java data layer. Physical table names are usually written in capital letters.
|
Name | Name refers to the logical name of the table that will be used in the application. It is used to access this table from customization codes. You can also create a link from the other tables. Name should be unique in the product and it shouldn’t be too long. This name is used in SQL queries that are sent to the database and if you give it a long name, it will extend the SQL query, which is not preferable. You may wonder why there are two names for a single table. Table name is a virtual name and you can use this name whenever you want to refer to this table in LPT environment. You cannot use physical name for the same purpose, because target database may be truncated or changed in run time due to the restrictions of database management system. |
Name Parameters | You can select name parameters by clicking this option. |
Description | It is an informative text used to provide information to programmers and users about the table. Table description is used in tools that lists the tables. (such as ObjectExplorer). |
Set Values | Set Values field is used only if you select “Set” in Name Parameters. Depending on set value variables, you can create one or more tables. If set variable is more than one, you must enter values by separating them with a comma (;). |
Template Name | If you want to use a template as the basis for the table definition, you designate the template definition name in this field. Table templates and how to use them will be mentioned later in this document. |
Package Name | If an interface will be created for this table, it shows the package in which this interface class will be kept. For further information see. Use of Interface in Data Objects document. |
Authorization Enabled | It indicates whether the table records will be subject to authorization code control. When set to true, a field named AUTHCODE is added to this table, and it is used to save authorization codes of the table records. When set to false, table does not have this property, meaning that table records are not authorized over the authorization code. The default value is false. |
Record Information Columns | It determines if system should keep track of when records are modified and by whom. When set to true, CREATEDON, CREATEDBY, MODIFIEDON, MODIFIEDBY fields are added to the table automatically, and they are filled after entering data in a table or updating data. When set to false, table does not have this property and system does not keep track of record entry or record updates. The default value is false. |
Cross Enabled | It indicates whether the table records are included in cross transaction infrastructure. When set to true, TE_SOURCEREF, TE_DESTREF, TE_SOURCECOMPANY and TE_DESTCOMPANY fields are added to the table. These fields store the records that are created as the result of cross transactions and match information for the source records. The default value is false. |
Exchangeable | It indicates whether the table records can be imported/exported. When set to true, table records can be exported or imported in intersystem data exchanges. TE_RIGHTS field is added to the table to allow data exchange. If some operations are to be restricted on the records that are imported with data exchange, Exchangeable field stores this information. For instance, you may want users only to view a specific record and not to be able to make any changes. In such case, this field keeps this information and does not allow modifying the record. The default value is true. |
Non-Schema Table | When checked, table definition is excluded when creating table definition and starting the table. |
Trigger Control | It determines whether triggers run for some of the records in this table. When set to true, TE_TRGCTRL field is added to the table. Data layer ensures that triggers do not fire for the record of which value is 0 in this field. The default option is false. |
Archive Table | This field shows whether table records are included in period archiving. When set to true, TE_ARCHSTAT field is added to this table. It stores the status of archiving operation. The default value is false. |
Lock Enabled | It shows whether table records can be locked exclusively in application codes for various purposes. When set to true, TE_LOCKED field is added. This field stores lock status information of the record. The default value is false. |
Work Product Table | It indicates whether work product table records are a work product definition in the Process Management module. A work product key value (identifier) is generated for the records that are work product definitions. If work product table value is true, TE_WPIID field is added to the table definition, and the key values of the work products corresponding to the records of this table are kept in this field. If work product table value is false, it means that table records do not correspond to any work product. Work product table value is true by default. |
Template Table | This option is checked to indicate that this table is used as a template. Tables that are used as a template have an application variable in their names. These tables are not created, updated and deleted by the application. The programmer, who uses the template table, creates, updates and deletes the table from the code behind for different values of the necessary application variable for this table. The default value is false. |
Multi Company | It indicates the multi-company property of the table. It has three options:
|
LOGICALEF | This field is the primary key of the table by default. A table can have only one primary key at a time. It provides system flexibility which is necessary to adapt to all types of database systems. It cannot be replaced by another identifier. |
Below are the examples for field definitions.

Name is the physical name of the field, and it is mandatory.
Alias fields are optional. However, they are used to create object code when needed.
Type indicates the type of the table. The options are String, integer, float, double, numeric, date, time, datetime, binary, byte, smallint, int64, blob and clob.
Size field value shows the length of data.
Primary Key designates the field as the primary key. A table can have only one primary key at a time. When a new key is added, the previous key is deleted.
Auto Increment increases the field value automatically.
Allow Null determines if the field value will be null.
Encrypted field indicates if the table field value is to be stored as encrypted.
User Can Encrypt field indicates that table field value will be stored after being encrypted with user encryption configuration.
DX Required designates if the field should be included in data exchange (import / export) mechanism.
Init Required is used in object code generation process when creating the starting methods for data.
Default Value designates the default value of the new field that is added to the table. It is optional.
Description is a small comment field describing the purpose of the table. It is optional.
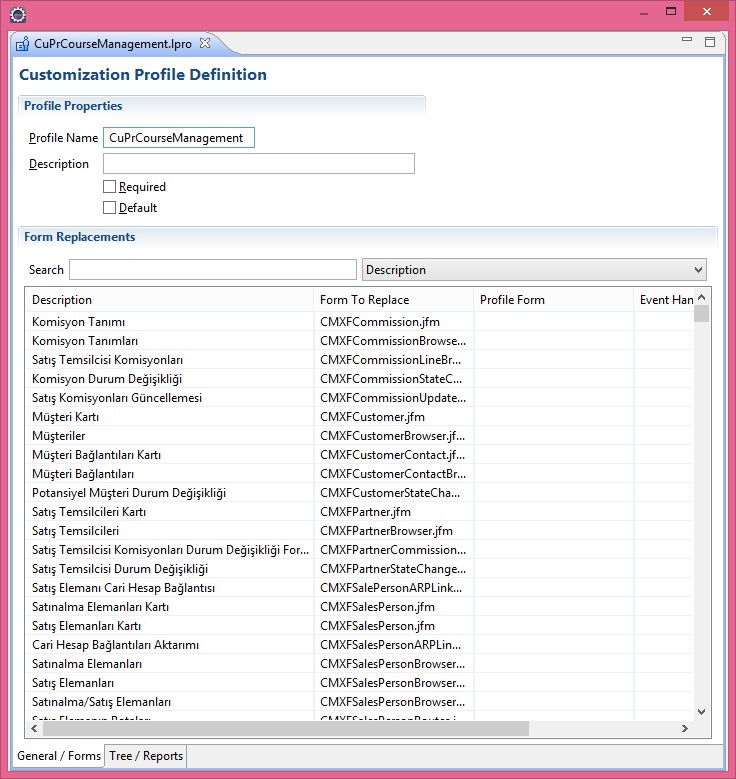
Profile Design Screen
Double click on Profile file to open design window.
This design window has two tabs.
General/Forms: This tab shows the general settings. You can select custom forms and handler classes instead of the forms available in the menu tree.
Tree/Reports: This tab consists of Tree/Report field and Tree Extension drop down box. You can select custom reports instead of the reports available in the menu tree.

LPT View
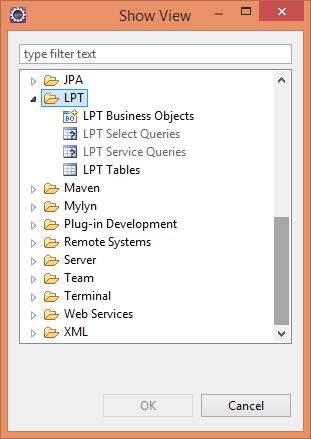
LPT View displays the content and structure of tables, business objects and queries (select queries and service queries such as Update, Delete and Insert) that are defined in j-platform application. Data shown by Views is retrieved from lbsDefinition.jar. When developing a customization project, you can access the product component you need through these Views.
You can open LPT views by clicking Windows > Show View > Other > Logo Customization Views in Eclipse menu.
The components that are directly linked to LPT have four different views.
Business Objects
When you double click on any of the objects in Business Objects list, BO structure is shown in “editors” view. Business object links and properties are shown.
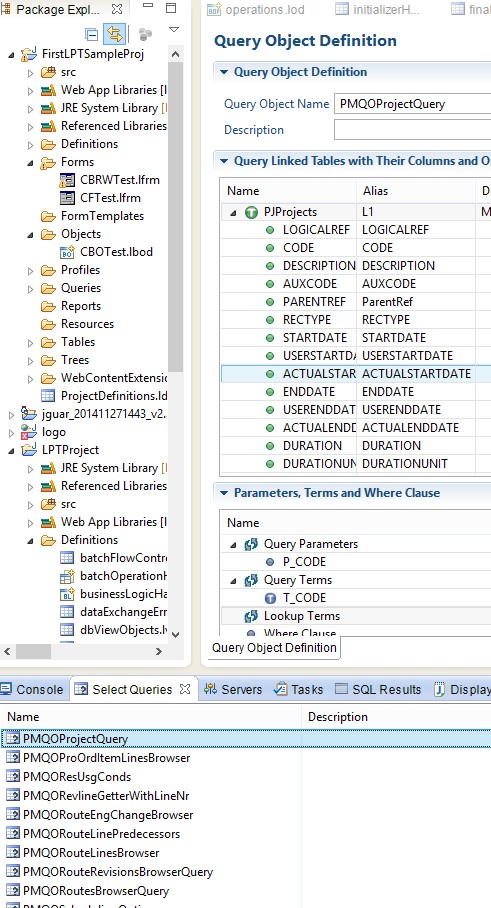
Select Queries
All existing queries of Select type are listed in View menu.
Double click a query to display the structure of the selected query. This structure shows the main table, query’s linked tables, commands and other properties
It also shows query parameters, conditions and “where” subclause in the same editor.
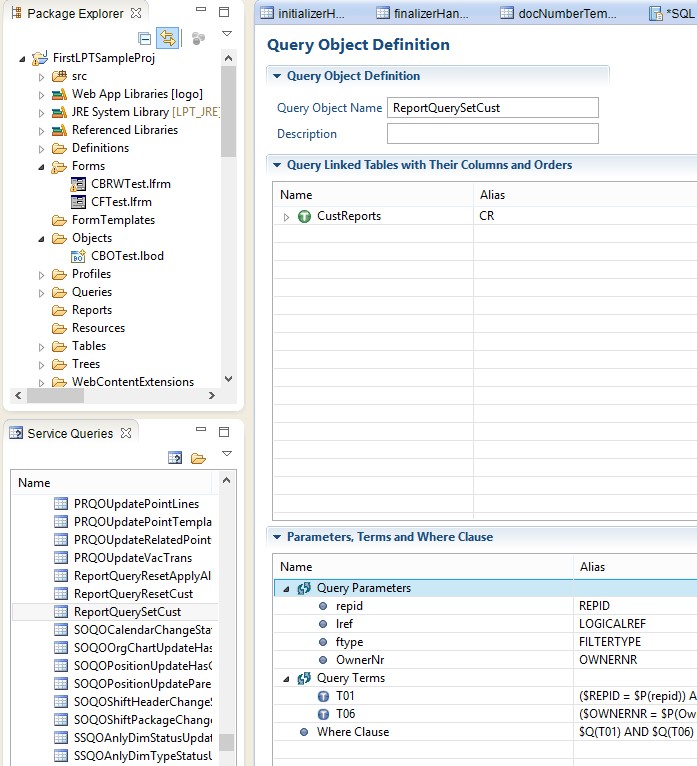
Service Queries
All existing queries of delete, update and insert types are listed in View menu.
When you double click a query, the selected query is shown in editor according to the query type. The main table, parameters and conditions in the query are also shown.
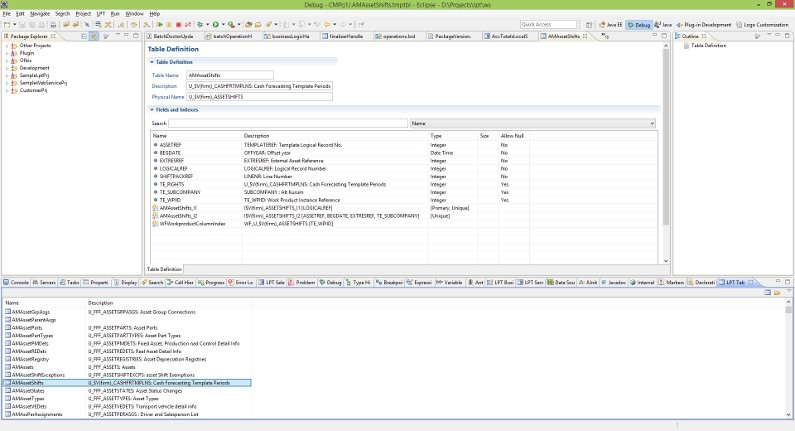
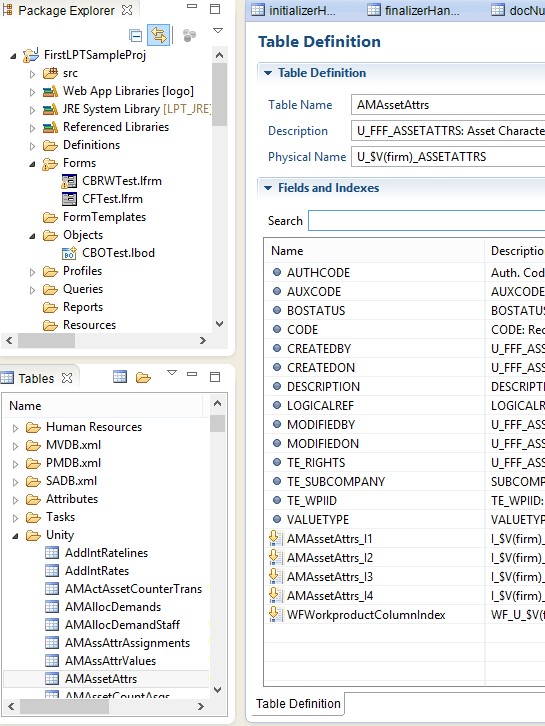
Tables View
When you select Table view, all existing tables are shown in View menu as shown in the image at right.
Double click on one of the tables to display the table structure. Table columns, type, dimension and other properties are shown.
Table indexes and properties are shown as well in this window.
LPT Menu
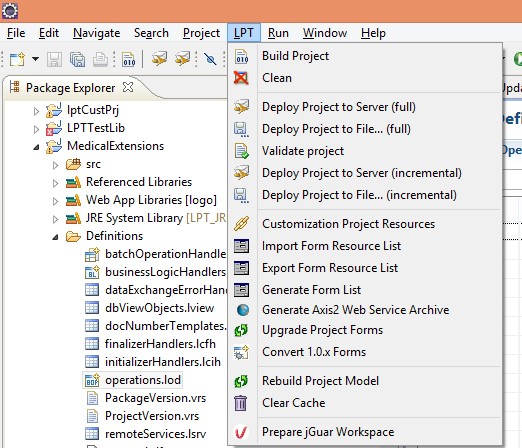
Build Project
First, output directory of the selected project is deleted and then java files are compiled. Build Project is used to detect errors and warnings in customization elements and source files of the customization project.
If you select Build Automatically option under the Project Menu option, Build operation start automatically after saving source codes.
Clean
It removes all compiled class files from the project. Run Build Project operation to see all errors and warnings related to the source code and project.
Deploy Project to Server (full)
Projects are kept in server with a GUID. GUID is a singular value for each project.
When you use this menu option, the selected project is compiled first, and then the existing project in server (if any) is overwritten. If there is no project in server, a new record is created.
Deploy project to server (full) option sends customization project with all sources to a specific server. To deploy a project, you need to specify the followings.
- Server URL
- User name
- Password and other options
The related parameters are designated under Properties > Logo Customization > Deploy menu of the project. All project is compiled before Deploy operation.
A customization project can be deployed to server only if Build process is completed smoothly without error.
Deploy Project to File (full)
A packaged file with Ipdd extension is created from the selected project. This file can be deployed to any server by using the product administration tool.
To do so, you need to run Customization Operations in j-platform Administration application.
Before packaging, you must perform validation and build operations as well.
Validate Project
It checks if forms are created in an applicable format. In case of detecting any inconsistency, you can see the details from “Problems” view. Warnings/errors may cause the project run improperly.
You can determine these inconsistencies and remove them.
Deploy Project to Server (incremental)
This option is especially used when deploying larger projects. System deploys only modified files.
When you use this menu option, the selected project is compiled first, and then the existing project in server (if any) is overwritten. If there is no project in server, a new record is created.
Deploy Project to File (incremental)
This option is especially used when deploying larger projects. System deploys only modified files in a package.
Customization Project Resources
You use this tool to save text resources with list ID and string tag information and to use this information anywhere in the customization tool to retrieve text resources.
Import Form Resource List
If formResourceList.txt file exists in the root directory of the project, this option imports the existing records to the related fields in the project.
Export Form Resource List
It saves the tags that are defined in forms of the selected project to the project’s root directory as formResourceList.txt. Right click on your project and select Refresh option to see that the file is added.
It can be used to update all resource values in the project from a single file.
Export creates formResourceList.txt file directly in the project root. After finding this file in the project root, Import starts import operation.
Generate Form List
It generates a report of form files that are used in the selected customization project in txt format. Report name is fixed and it is named FormList.txt. This report gives information about the version for customization forms and the basic form and the content of the profiles that are used in the project.
Generate Axis2 Web Service Archive
It is a shortcut that you can use to package web service classes written in customization project into an axis2 web service archive.
Upgrade Project Forms
It is usually used in version transitions. All forms that are prepared in older versions of LPT are made applicable to the new version automatically. This menu option updates customization forms that were created in 1.1.10 and later versions by the form definitions in up-to-date LbsDefinitions.jar file. Each form keeps information about the related version in which LbsDefinitions.jar is created (updated). When project’s LbsDefinitions.jar file is updated by a newer version, it updates the forms according to the form definitions in LbsDefinitions.jar. When updating the forms, a file with “.bak” extension is created. This file is the backup of the form taken before it is updated. The file with .bak extension allows you to access the file before update.
Convert 1.0.x Forms
This menu option converts customization forms that are prepared in 1.0.x versions to have them work smoothly in 1.1.x versions. It searches all files with .lfrm extension, and if these forms are not applicable to 1.1.x version (if they are created with 1.0.x versions) this option makes them applicable to 1.1.x version and updates form version information.
It does not perform any operation for the forms in 1.1.x version.
It is used to convert very old forms to a new form type. This option is no longer used commonly.
Rebuild Project Model
It recreates project model that is required for deploy by re-compiling the project.
Clear Cache
This menu option clears the content of the folder that is used as cache.
Prepare Logo Workspace
When Logo Web Project is selected, a dialog window opens to prompt you to select source code. After selecting source code, you’ll be able to access source codes automatically in the project. This option creates Eclipse Launch configurations automatically.
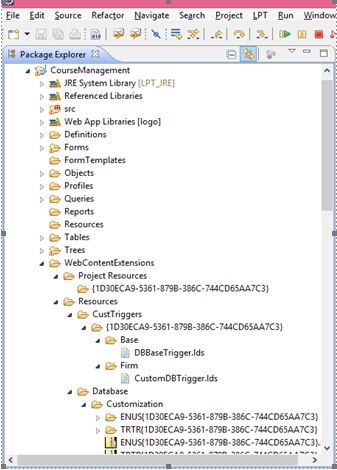
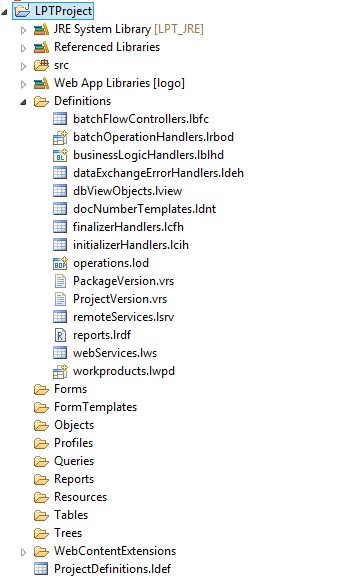
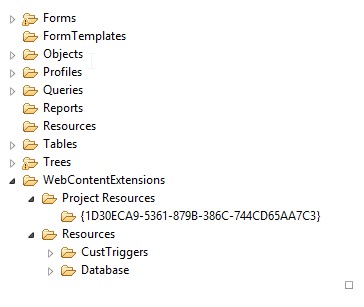
Project Directory and Files
When a LPT Project is created, file-directory structure will be as shown in the image.
Src | All Java files are kept under this directory. Handler Java classes of the forms are stored under the package specified here. |
Web App Libraries [Logo] | These are jar files under Logo/WebContent/WEB-INF/lib. Logo web application libraries are added to your project automatically |
Definitions | The tools that you will use in the project are defined here. |
Forms | It is the directory of browser and card forms. |
Form Templates | You can add a frequently used form to this folder to use it as a template. |
Objects | It is the directory of business objects. |
Profiles | It is the directory of profile definitions |
Queries | It is the directory of query objects. |
Reports | It is the directory of report objects. |
Resources | It is the directory of definition files. |
Tables | It is the directory of table objects. |
Trees | It is the directory of tree object. |
Web Content Extensions | Additional contents are kept here. (Project resource and trigger files) |
Customization Batch Flow Controller
You define additional operations to perform before starting and completing batch operation.
For instance, after batch invoice approval operation that is defined in the product, there will be approved invoices. You can have these invoices moved to backup database in this window.
Name | The name of the flow controller. |
Batch Flow Controller Package | The packages that are defined in the project are listed in this field. You can select the required package in which you want to keep controller java class. |
| Batch Flow Controller | The java class of the controller. |
| Batch Name | The name of the batch operation that is defined in the product. |

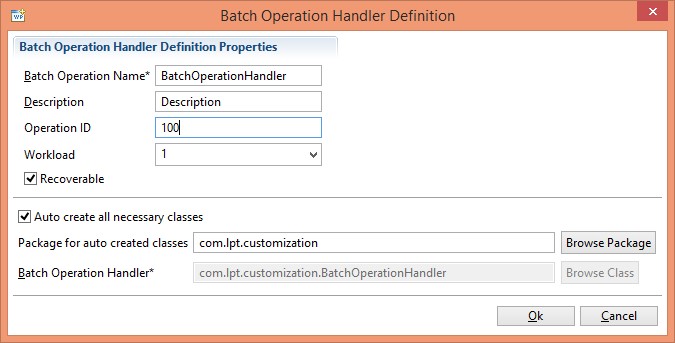
Batch Operation Handler Definition
It is the definition of the batch operation that will run in server.
Name | The name of the batch that will be saved in server. |
Description | The definition of operations that will be performed with Batch. |
Operation ID | Unique operation number. |
Workload | Numeric value that shows CPU load. |
Recoverable | It indicates if the operation can resume on. |
Auto create all necessary classes | It generates batch class automatically. |
Package for auto created classes | You select a package for the class that will be created automatically. |
Batch Operation Handler | You select batch class in this field if it is not created automatically. |
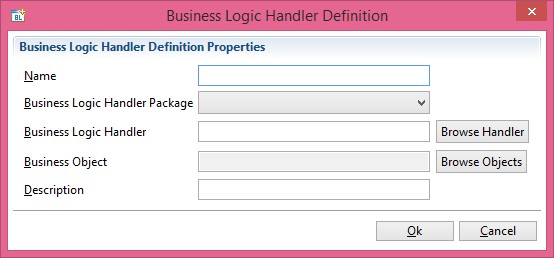
Business Logic Handler
You define the operations to perform before / after and when saving, deleting, adding, updating etc. within the scope of business logic. You can link this class to a business object only.
Name | The name of the BO handler. |
Business Logic Handler Package | Package name. |
Business Logic Handle | You can create a new handler class or use the current one. |
Business Object | It is the business object that is linked to the handler. |
Description | The description of the business logic handler definition. |
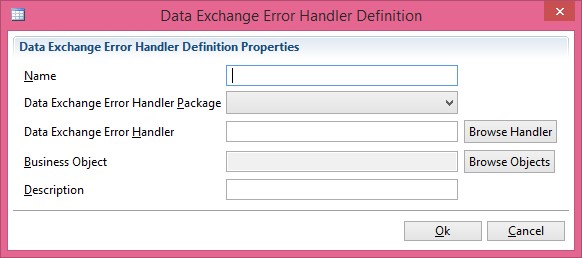
Data Exchange Error Handler Definition
It is the definition that manages errors which occur during data exchange for the specified business object.
Name | The name of the handler. |
Data Exchange Error Handler Package | You select the package in this field. |
Data Exchange Error Handler | It is the handler class. It implements IdataExchangeHandler interface. You can write handler methods in case you encounter any error in data exchange. |
Database View Object
There are two ways to use this object:
- You can use Database View Object to use a View definition in the database for your LPT project.
You can use it to create a new View in database. To do so, you need to define the View object.
Name
The name of the View object.
Physical Name
The definition of the View in database.
Query Name
You select sample query object.
Description
The description of View definition.
Server Side It runs when initializing the server.
Client Side It runs when initializing the client.
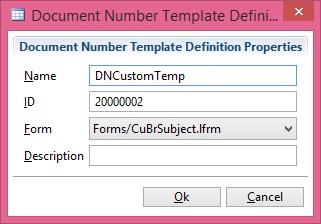
Document Number Template
You can define a custom number template in LPT for the custom objects (CBO) you define in LPT application.
Name | The unique name of the template. |
ID | Unique ID number. |
Form | Form information is not mandatory. |
Description | The description of number template definition. |
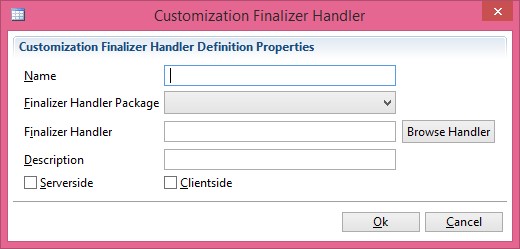
Finalizer Handler
It is used for operations that should be performed to finalize the customization after terminating the server or logging out of the product.
Name | The name of the Finalizer. |
Finalizer Handler Package | The name of the package. |
Finalizer Handler | Finalizer class. |
Description | The description of the finalizer handler. |
Serverside | It runs when terminating the server. |
Clientside | It runs when terminating the client. |
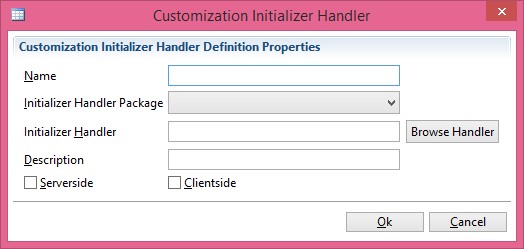
Initializer Handler
You define the operations to perform when initializing the server or after logging in the product.
Name | The name of the initializer. |
Initializer Handler Package | The name of the package. |
Initializer Handler | Initializer class. |
Description | The description of the initializer handler. |
Serverside | It runs when initializing the server. |
Clientside | It runs when initializing the client. |
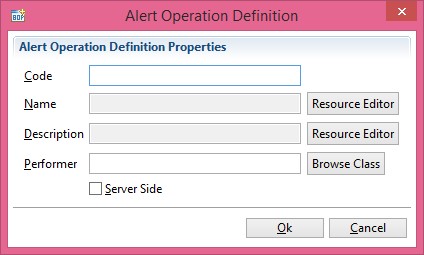
Alert Operation Definition
It is used to define scheduled operations.
Code | The code of the definition. |
Name | The name of the definition. |
Description | The description of the definition. |
Performer | You select / enter the class in which Alert definition will be made. |
Serverside | It indicates if the Alert will run on server side. |
Package Version (Example: 1.1.12)
It is editable. It can be increased automatically after each deployment.
Project Version (Example: 2.36.6.0.3)
Only the last number refers to the project version. The previous values belong to the j-platform version.
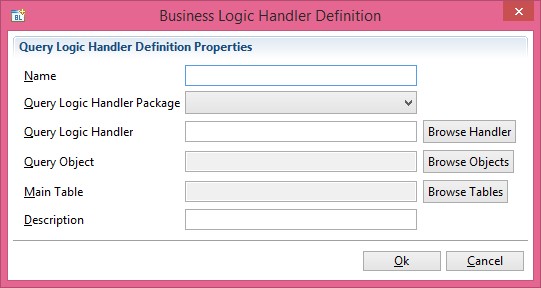
Query Logic Handler
You define the operations to perform before / after and when saving, deleting, adding, updating etc. within the scope of query logic. You can link this class to a query object only.
Name | The name of the query object handler. |
Query Logic Handler Package | The name of the package. |
Query Logic Handler | You can create a new handler class or use the current one. |
Query Object | It is the query object that is linked to the handler. |
Description | The description of the query logic handler definition. |
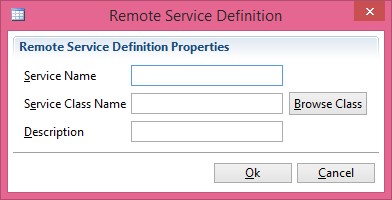
Remote Service Definition
It is the service definition that is used for the code running on server side.
Service Name | The name of the service. |
Service Class Name | The name of the service class. |
Description | The description of the service class definition. |
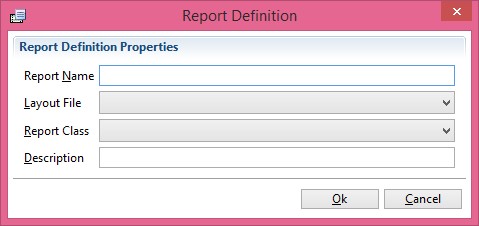
Report Definition
You make report definitions in this window.
Report Name | The name of the report. |
Layout File | The layout file of the report. |
Report Class | The report class of the report definition. |
Description | The description of the report definition. |
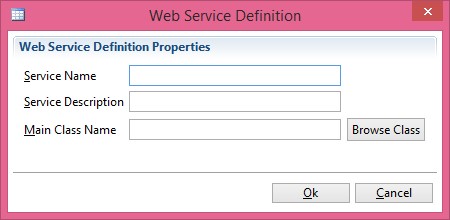
Web Service
It is a definition used to create custom web service. It allows customization codes to be used as web service.
Service Name | The name of the service. |
Service Description | The description of the service. |
Main Class Name | The class in which this service will be defined. |
Description | The description of the report definition. |
Business Object Work Product Definition
It allows you to use business objects over Process Management.
Code | The code of the work product definition. |
Name | The name of the work product definition. |
Description | The description of the work product definition. |
Business Object | The BO of the work product definition. |
Edit Form | The form object of the work product definition. |
Editor Initializer | The form initializer class. |
Browser Form | Browser form object. |
Report Work Product Definition
It allows you to use report objects over Process Management
Code | The code of the report work product definition. |
Name | The name of the report work product definition. |
Report | The report object. |
Hidden Filters | Filters that should be hidden. |
Client Report Initializer | The class of client report initializer. |
Server Report Initializer | The class of server report initializer. |
Description | The description of the report work product definition. |

Directories
Forms: It stores browser and form objects.
Project Settings
The following information will be advantageous for you to know when you create a new project or when you import an existing project into your environment.
Eclipse Logo Preferences
Preference settings are as below for Logo customization projects in Eclipse Integration Development Environment. Go to Eclipse menu and click Windows > Preferences and select Logo option in the window that opens.
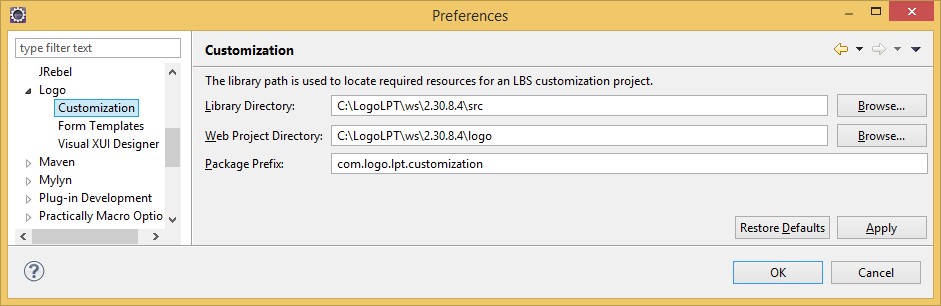
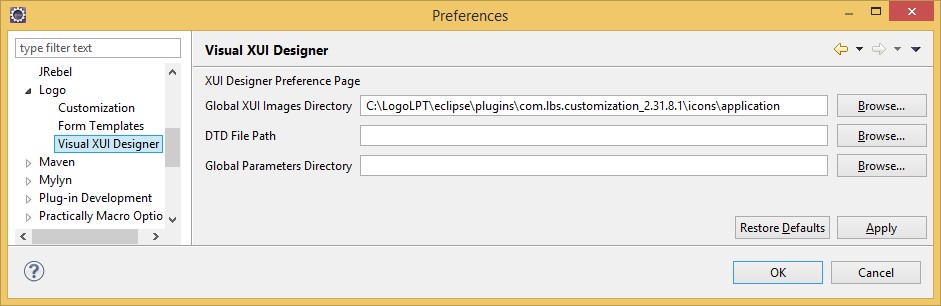
DTD File Path and Global Parameters Directory fields are not used for customization.
Project Definition
Open package explorer view from Eclipse. Right click and select New > Others… (Ctrl+N). Select Logo Customization Wizards > LPT Project in the wizard window that opens.
Enter project name in this wizard window and complete project definition.
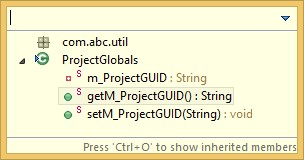
GUID (Globally Unique Identifier)
Project GUID is generated exclusively when a project is created. It is a read-only field and cannot be changed. Your customization is deployed to the system with this ID. Since multiple customizations can be deployed at once, this unique value is used to distinguish customizations from one another.
GUID is regenerated when the project is imported to LPT.
Programmers use this ID value in multi developer environment to run their customization code on the same application sample in a different container. When developers wish to work on the same customization container, project settings should be transferred from the original source to the target LPT installation.
GUID code is used in coding when developing a project.
When running the custom query you created in your customization project, you need to assign GUID as the parameter.
You’ll see that ProjectGlobals.getM_ProjectGUID() method is used in many places in ProjeUtil.
public class ProjectGlobals

{
       private static String m_ProjectGUID = "{BE0B9A25…32D0C0F}";
       public static String getM_ProjectGUID()
       {
             return m_ProjectGUID;
       }
}
After selecting the Project in Package Explorer view, click Project > Properties > Logo Customization option. You can perform import and export operations by using Export Settings and Import Settings buttons.
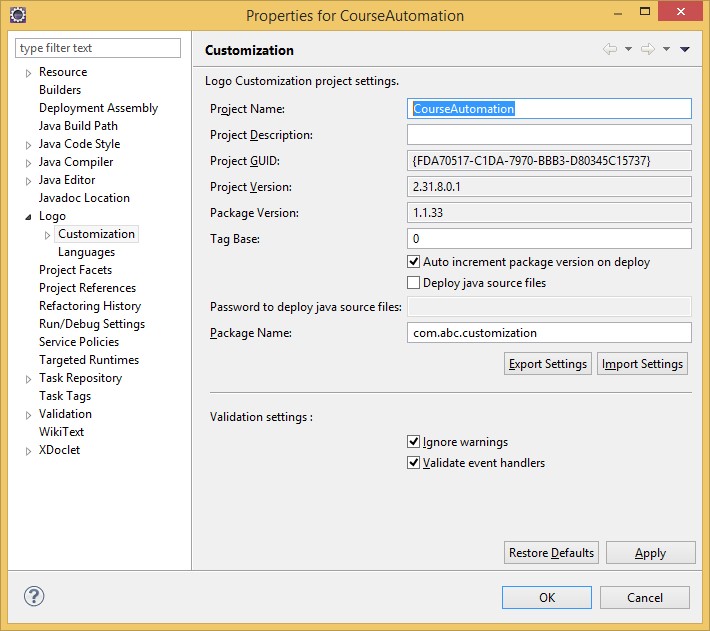
Tag Base | The start value of the tags belonging to the components and trees that are used in customization project. |
Validation Settings | You make necessary adjustments to validate the warnings and event handler errors that you encountered when deploying. |
Ignore Warnings | When checked, project warnings do not block deploy operation. |
Validate Event Handlers | It is checked to validate the errors in event handler. If it is checked and an error occurred in handler classes, system gives error when deploying and it stops the operation. |
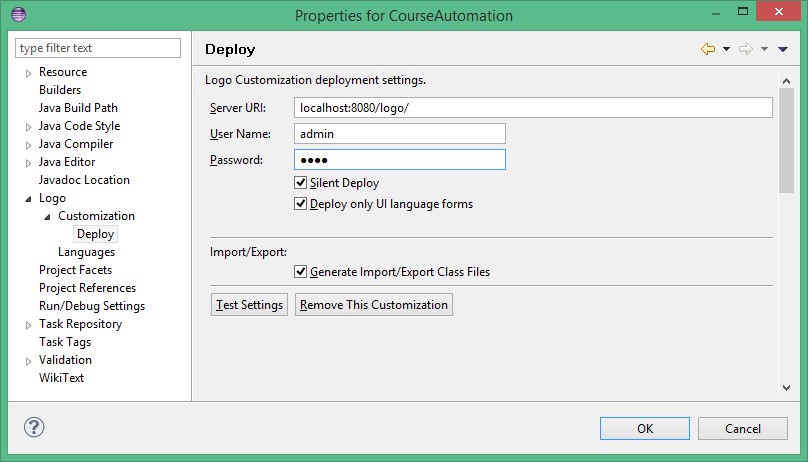
Adjusting Deploy Settings
Silent Deploy | It is used to run deploy operation in the background in Eclipse environment. |
Deploy only UI language forms | Deploy is performed only for the language selected in UI language (Languages page). |
Export / Import | It generates required classes to import / export data from the form if Generate Import/Export Class Files is selected. Note that you must check this option to use custom business objects in data exchange. These classes are sent to the server together with the project when deploying. They are not shown as a file in LPT development environment (Eclipse) project directory. |
Remove This Customization | It removes the project from the server database completely. |
ProjectUtil and Project Global
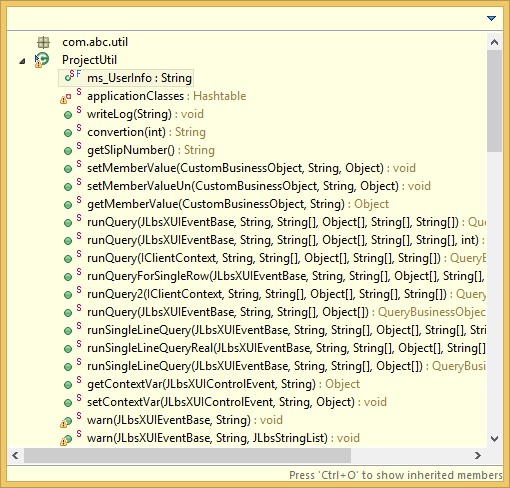
They are the java classes that should be under the util package of your project.
ProjectGlobal.java: When a project is created, the specified GUID value is written to this file, and it is read from this file during the project development.
ProjectUtil.java: It is a class that contains frequently used methods facilitating the customization.
Database Configuration
The parameters related to the database to which the application will connect are kept in DBConnection.xml file. DB parameters in this file are read when opening j-platform and when connecting to DB.
Below are the examples for SQL Server, MySQL and PostgreSQL. A j-platform server connects to one database only. Therefore, you need to designate an active configuration to use.
DBConnection.xml file directory address: /Logo/WebContent/Config/System/DBConnection.xml
<?xml
version="1.0" encoding="UTF-8"?>
<!DOCTYPE
data-config

 SYSTEM
"../Grammar/DBConnectionConfig.dtd">
<data-config>

<login-infos>

 <login-info
database-name="jguardb"

database-type="MS-SQL"
name="LOCAL-MSSQL"

server-name="localhost"


sub-type="none"
user-name="sa"
user-password="Logo"/>


<login-info
connection-string="jdbc:oracle:thin:@172.16.12.50:1521:ORCL2"

database-name="LogoTEST"

database-type="Oracle"

name="LogoTEST-TT-Orcl"

sub-type="none"
user-name="LogoTEST"
user-password="LogoTEST"/>

<login-info database-name="LogoTEST"

database-type="MySql"
name="MySQLTest"

server-name="172.16.12.81"

sub-type="none"

user-name="LogoTEST"

user-password="LogoTEST"/>


<connection-pool inactive-timeout="0"
pool-size="10">


<active-login-info name="LOCAL-MSSQL"/>

</connection-pool>

</data-config>
Server Configuration Settings
Serverconfig.xml
This is a configuration file allowing to adjust the settings of the application server centrally.
By using the content of logo\WebContent\Config\System\ServerConfig_CUST.xml file as a template for customization, you can determine the parameters that are applicable to development environment and create ServerConfig.xml.
ConsoleConfig.xml
You adjust the related settings to display logs on level basis.
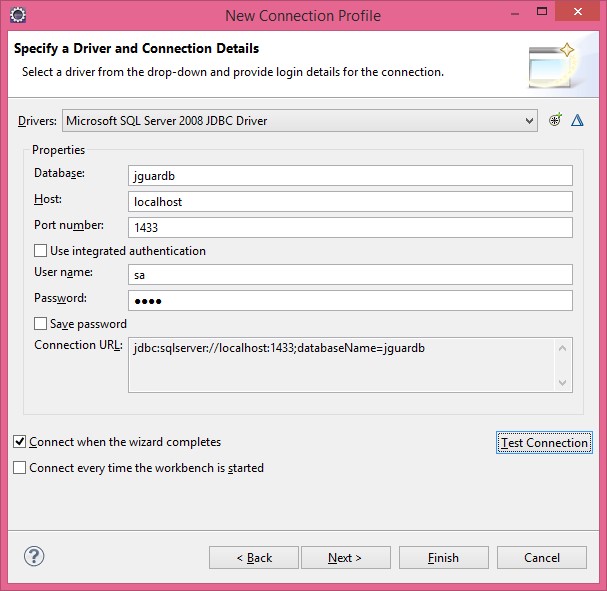
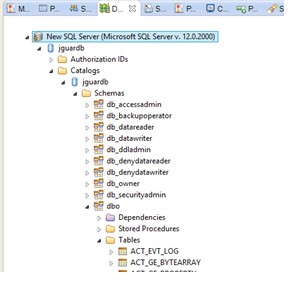
Eclipse Data Source Explorer Settings
You access database from this window. It should provide convenience to have it in LPT during development. Select Data Source Explorer from Windows > Show View > Others. Below you can see configuration and Explorer.
Servlet Types and Functions
/ListSessions | It shows current server session list. |
/RunApp | It runs j-platform application as an independent applet. |
/RunEDefter | It runs e-ledger application as an independent applet. |
/Status | It opens j-platform Status portal. Status is an integrated portal where you can perform various operations concerning the product management. |
/Activation | It opens the activation portal where the product is licensed. |
/services/ListServices | It opens the portal that lists axis2 web services that are uploaded to j-platform and where you can retrieve wsdl information. |
/rest/?_wadl /restservices/rest/?_wadl | It opens the portal that lists REST Web services that are uploaded to j-platform and where you can retrieve wadl information. |
/smart/login | It opens j-platform login page. |
/smart/admin | It opens j-platform Administrator login page. |
/smart/sadmin | It opens j-platform Server Administrator login page. |
/smart/e-defter | It opens e-Ledger login page. |
/smart/run | It runs j-platform application as an independent applet. |
/smart/run/e-defter | It runs e-ledger application as an independent applet. |