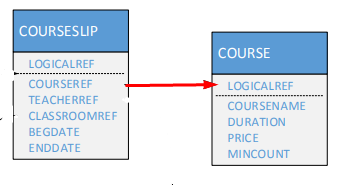
It can be used if it is desired to establish a connection between business objects. Let's try to explain using the Diagram below.

There are associative links to the progeny we have created on the diagram. As an example, we will show how the relation between courseSlip and course is established. There are two methods to accomplish this link.
1- Linking over a Table
This method is a method that helps establish Link through Tables.
- The CourseSlip table is where you want the record to be recorded
- The CustomTable Screen, which defines the Table of the CourseSlip screen, opens. When you click the right click> Add button in the Table Link Properties, the link creation screen opens.
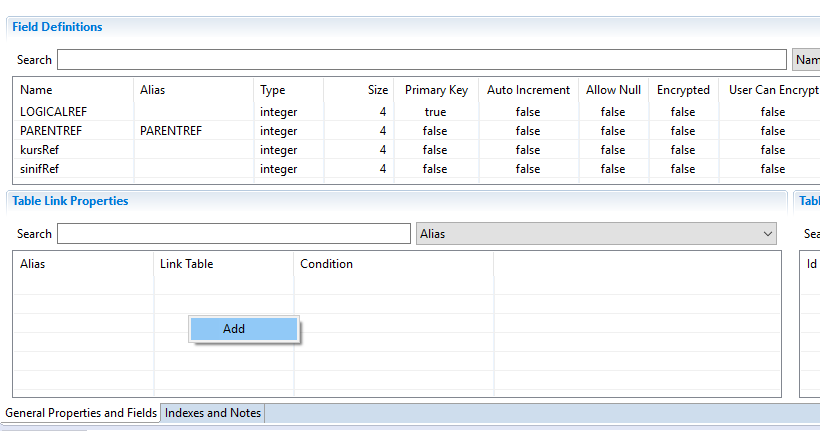
- The type of relationship is determined on the screen that opens.
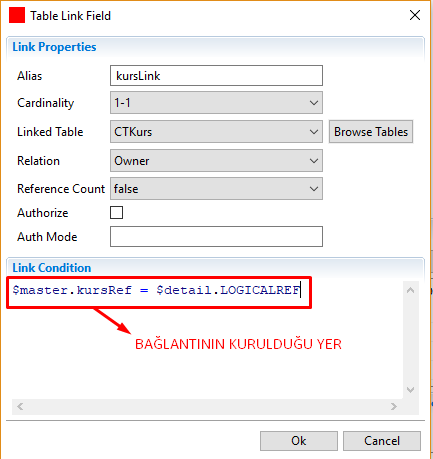
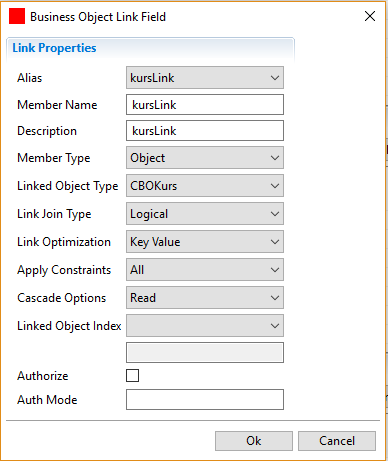
Alias: The name was given to call Link.
Cardinality: The connection type is selected.
Linked Table: The table will be selected.
Relation: Indicates the type of relationship:
owner: It means that the records on the table being defined have the records on the associated table. Generally, the associated table holds detailed information about the table definition. For example, the lines of the invoice.
reference: Indicates that the record in the definition table points to one of the records in the associated table. There is no ownership relationship between the records of these two tables. Records from one of the tables point to records from the other. For example, the current account information used on the invoice. This is the default option.
Reference Count: Specifies whether or not to perform reference collection between records in tables that are usually relationship type references. The reference collection is a mechanism that prevents the deletion of this record in the event that there are other records pointing to a record. If the value of this property is true, before deleting the records in the associated table, it is checked whether the records indicate to them or not, and if the record is pointing, deletion is not allowed. If the value is false, these checks are not performed. The default value is false.
Authorize: Specifies whether data objects are inserted in this connection.
Auth Mode: If the data object inserted by this connection defines more than one authorization mode, it specifies which mode this connection uses.
Link Condition: "$ master.COURSEREF" courseRef located on the course slip screen. "$ detail.LOGICALREF" is the LOGICALREF of the course table, we link them as follows. Pressing the arrow key completes the link definition process.
- The last step is to complete the process with the "OK" button. To establish the connection between the two tables, we need to call the Curslink connection from within the CBO of the Curslip. Open CBOKursSlip and click the right mouse button> Add to Link Field Definitions (Preffered).
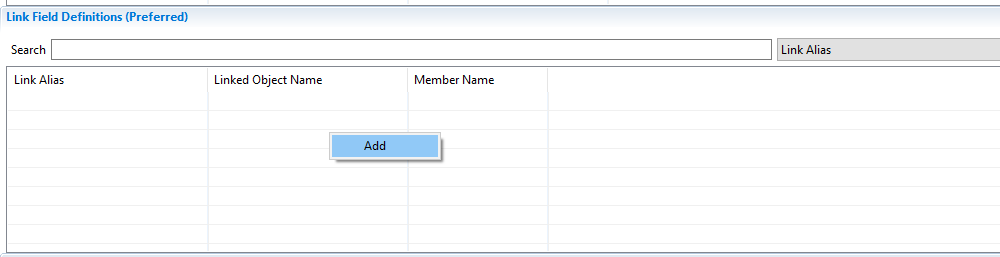
- The CourseLink that we have defined as ready on the screen comes to the top. We can use it in other fields to determine the types of relationships.
Alias: The location where the alias of the link created in the table is selected.
Member Name: Name given to Link.
Description: Description Field.
Member Type: The type of connection is selected. Object (1-1) or Collection (1-N)
Linked Object Type: We will select CBO presentation (CBOCourse).
Link Join Type: Specifies the connection type. Specifies how the query will read the data object connected while the data object is being read.
Link Optimization: Specifies the method to be followed to optimize whether the linked data objects are readable. Data objects that are bound to a data object while read is also read. At this point, there may not be records that provide concatenated data for the linked object. In this process, the data layer tries to make an optimization without going to the database and continues without reading the database query for objects that are not possible in the database. This property determines how this optimization is done.
Apply Constraints: Determines which expressions in the conditional statement are to be reflected on the object to be saved during the registration of the linked data objects.
Cascade Options: Includes 4 options;
Read: When the data object is read from the database, it indicates that these linked objects can also be read.
Inserts: Specifies whether to add (add or remove) these objects when the data object is added to the database.
Updates: Specifies whether to save these objects while the data object is saved to the database after the change.
Deletes: Specifies whether these objects should be deleted when the data object is deleted from the database.
Linked Object Index: Link is the index of the data objects to be installed.
Authorize: Specifies whether data objects inserted by this connection are included in the automatic authorization.
Auth Mode: If the data object inserted by this connection defines more than one authorization mode, it specifies which mode this connection uses.
- Finally, when the definitions are finished, we will complete the operation with the 'OK' button.
2- Linking over CBO (Custom Business Object)
This method is the one that helps establish Link through the CBO. Only Custom Business Objects are used.
- The CourseSlip table is where you want the record to be recorded
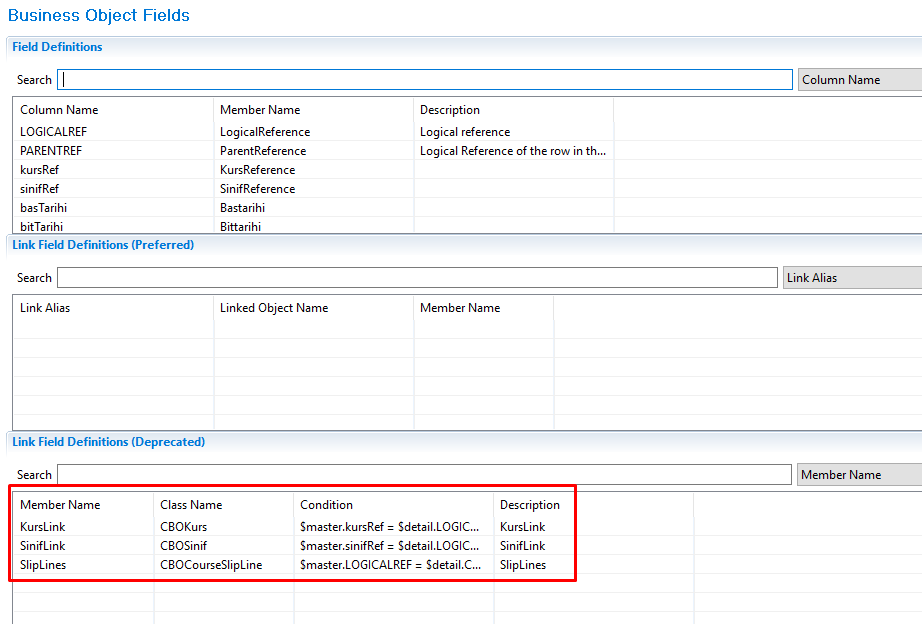
- The CustomBusinessObject screen for the CBO of the CourseSlip screen is opened, and the field definitions tab is clicked. In the following figure, click the right click> ADD button in the "Link Field Definition (Deprecated)" list and a link creation screen opens.
- The type of relationship is determined on the screen that opens.
Member Name: Name given to Link.
Description: Opening Area.
Member Type: The type of connection is selected. Object (1-1) or Collection (1-N)
Linked Object Type: We will select CBO presentation (CBOCourse).
Link Condition: "$master.COURSEREF" CourseRef located on the course slip screen. "$ detail.LOGICALREF" is the LOGICALREF of the course table, we link them as follows. Pressing the arrow key completes the link definition process.
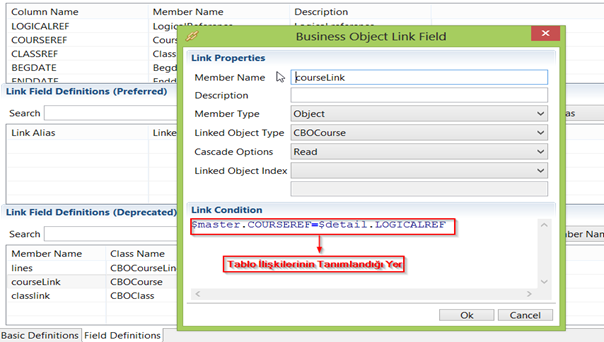
- The last step is to complete the process with the "OK" button. The connection between the two tables is established.