The customization process is very much like product development. The major difference is the implementation rules and methods are predetermined.
That is, there are constraints and restrictions on how you create and manipulate objects within the customization framework.
The details will be explained in the corresponding section along with basic examples. On the other hand, the programmer is free to use the Java language and other third-party libraries. The customization tool provides great java editing tools and wizards as well as using code templates.
The customization process starts with the gap analysis to define what needs to be done to the existing product to meet the customer’s requirements.
The system design comes after the analysis process and then the actual customization implementation begins.
Creating the Project
Now that the basic elements of the Workbench have been explained, here are some instructions for creating a simple project. New projects, folders,
and files can be created using several different approaches. In this section resources will be created using three different approaches:
a) File menu
b) Navigation view context menu
c) New Wizard button
For our simple tutorial, File menu will be used for creating the project. The step-by-step description is as follows:
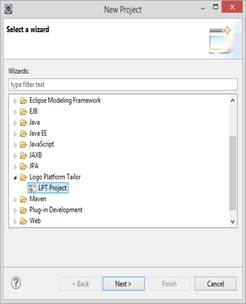
Select File > New > Project…
In the project wizard, Select Logo Platform Tailor > LPT Project, and then click Next button
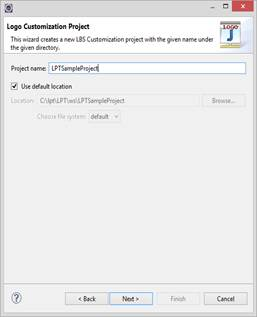
In the Project name field, type the name of your project name. For maximum portability do not use spaces or special characters in this field.
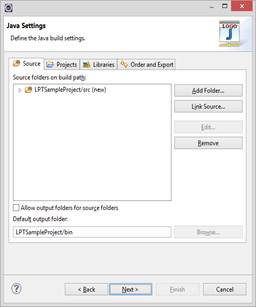
If you are experienced in Java, you can set the Java Settings in the following dialog. The default settings are sufficient for initial projects.
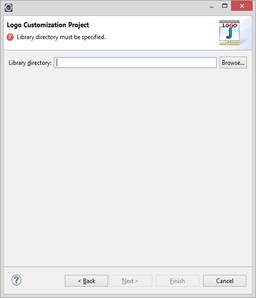
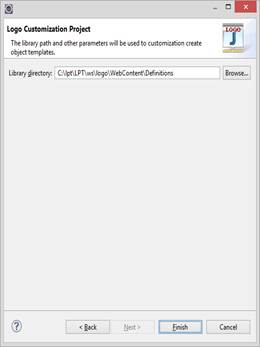
You should input the directory of Unity on Demand Library which includes LbsDefinitions.jar.
Click on the Finish button to create the customization project.
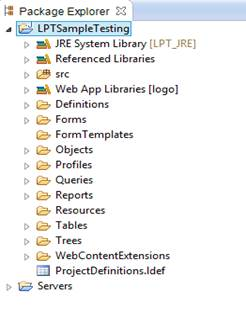
In the Package Explorer view, you can see that the customization project is created with the default libraries, folders, and files. This initial configuration is provided by default, you can
always add new library references from Project > Properties menu and include more resources (files, folders, etc.) whenever you need.
Customization projects are regular Java projects in many ways. The main difference is that the customization projects have ‘Logo Customization Builder’ registered in their builder list.This registration operation is done upon the project creation as well as other initializations.
Hence, it is highly recommended that the customizations projects are created with the built-in customization project wizard as shown above.
Setting project properties
The first step in creating the customization project is to set its properties.You can achieve this by selecting on the project in the Package Explorer view, then select Project > Properties > Logo Customization.

The Project Name field is set to the project name by default and can be changed at any time. As the name implies, the Project Description field contains a descriptive text of the project. The Project GUID is uniquely generated when the project is created and this field is read-only. Since multiple customizations can be executed on one installation, this unique value is used to differentiate one from another. The Package Name is the default package name for generated class files. In the class wizard, you can always have the possibility to change the package name.
Important: The usage of package names starting with ‘com.lbs.’ is strongly discouraged. To eliminate possible conflicts with the existing application, these files will not be copied to the server at deployment time.
The Project GUID is regenerated every time when the project is imported to a new LPT installation. This operation is required since the GUID must be unique even when it is copied. In multiple developer environments, this id generation enables programmers to execute their customization code in a separate container on the
same application instance. When developers would like to work on the same customization container, the project settings need to be exported from the original source and imported to the destination LPT installations. You can do these import/export operations by using Export Settings and Import Settings buttons.
LPT includes a compiler of its own for validating user-defined tables, objects, forms, etc. When the option Ignore Warnings is checked, compiler warnings will not be displayed in the Problems view and deploy operation will not ask for confirmation in case of Java warnings. We recommend you to leave this option unchecked unless
it is really needed.
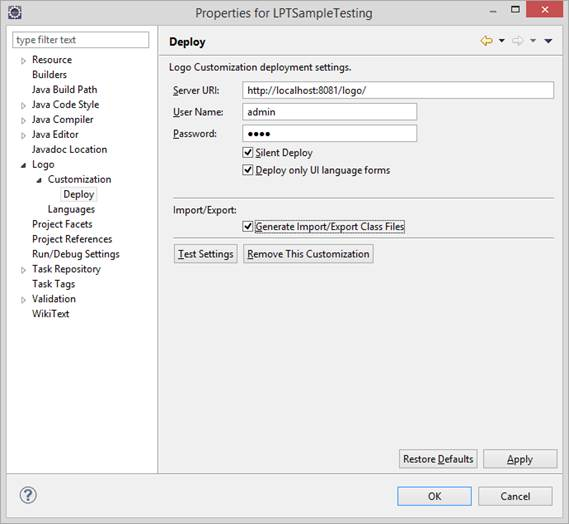
LPT projects can be deployed directly to an application server within the IDE. In the Deploy settings, you can specify the Server URI, which is basically the internet address of the target application. Since only authorized users can deploy customizations, the User Name and Password fields must be provided. You can test the validity of these three parameters (URI, username and password) by clicking on the Test Settings button.
Important: You can also clear previous customizations by clicking on the Clear Customizations button. However, please note that this operation will clear all customizations on the application server, not only previous release of yours.
When the option Silent Deploy is checked, the deployment engine does not show any message dialog during and after the deployment. As the name is self-explanatory, Deploy only UI language forms option determines that all forms or default language forms will be deployed to the server. During development, it is best to check this option since it reduces the deployment time a lot, especially over a limited connection.
LPT has a business object and query object generator wizard. Object Generation preference page provides settings for this wizard. The package names will be used for
generated object classes by object generator wizards.
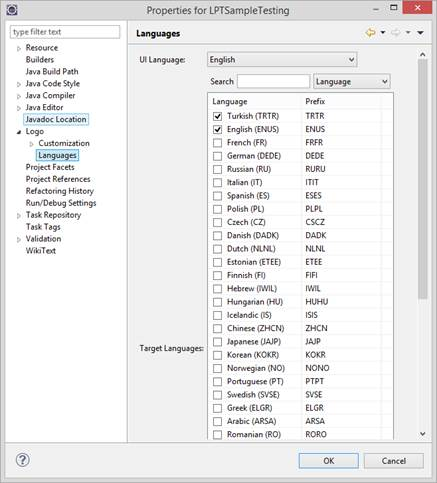
LPT supports multi-lingual customization development. You can specify the target languages anytime during development. However, it is best to specify this at the beginning since text editors can help you enter text in multiple languages on one screen. The options UI Language determines the default language for forms in the IDE. All forms will be created and displayed in the selected language by default. You can also change the form language while designing your forms. Please note that the forms are language-neutral and can be translated to selected languages based on the given language texts. At deployment time, forms are built for each selected language and deployed accordingly.