Burada Logo CRM Modülünün XAF Projesi içerisinde kullanılması, istenirse Logo CRM XAF modülü kullanılarak bütünüyle ayrı bir uygulama geliştirme adımları anlatılacak.

1. Adım : Proje Oluşturulur

Proje oluşturmak için Proje oluşturma sayfasını inceleyebilirsiniz.  (Kullanıcı denetimi için Authentication Standart seçilmelidir. )


2. Adım  : VT Ayarları


VT Ayarları solution.Web uygulaması altında bulunan Web.config xml dosyasında tutulur. Aşağıdaki örnek bu dosyanın default durumudur. 

Dikey uyarlama projesine Logo CRM VT ayarları set edilmelidir.

Web.config
  </appSettings>
   <connectionStrings>
    <add name="EasyTestConnectionString" connectionString="Integrated Security=SSPI;Pooling=false;Data Source=(localdb)\mssqllocaldb;Initial Catalog=Solution10EasyTest" />
    <add name="ConnectionString" connectionString="Integrated Security=SSPI;Pooling=false;Data Source=DB_SUNUCU;Initial Catalog=LOGOCRM" />
    <!--    
    Use the following connection string to connect to a Jet (Microsoft Access) database that is already created and located in the <application root>/app_data folder. 
    <add name="ConnectionString" connectionString="Provider=Microsoft.Jet.OLEDB.4.0;Password=;User ID=Admin;Data Source=|DataDirectory|\Solution7.mdb;Mode=Share Deny None;"/>
    If the database doesn't exist, it won't be created until you replace the |DataDirectory| substitution string with the fully qualified path to the database. For instance:
    <add name="ConnectionString" connectionString="Provider=Microsoft.Jet.OLEDB.4.0;Password=;User ID=Admin;Data Source=C:\myDataFolder\Solution7.mdb;Mode=Share Deny None;"/>
    -->
  </connectionStrings>
  <system.diagnostics>


Visual Studio içerisinden View/ Server Explorer altından LogoCRM'in bağlı olduğu veri tabanının tablolarını görebilirisiniz.

3. Adım : Logo CRM Modul Ekleme

Logo CRM iş nesnelerinin model editorde görünmesi için eklenmesi gerekir.


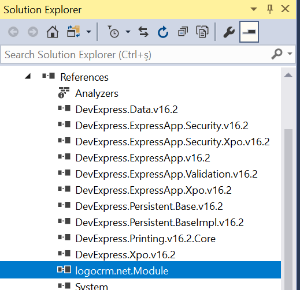
Çözüm ortağı setindeki logoCRM.Net.Module.dll'in eklenmesi gerekir.

Logo CRM Module dll'i otomatik olarak proje referansına eklenecektir. Manuel olarak eklenmemelidir.


4. Adm : LogoCRM'in Module.cs e Eklenmesi

Modules.cs dizaynırı açıkken;

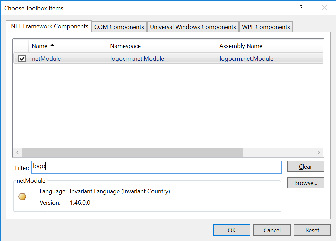
Toolboxtan General/sağ klik/choose items seçilir.

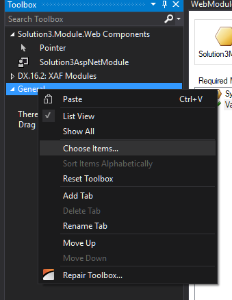
LogoCRM.net.Module.dll browse edilerek eklenir.

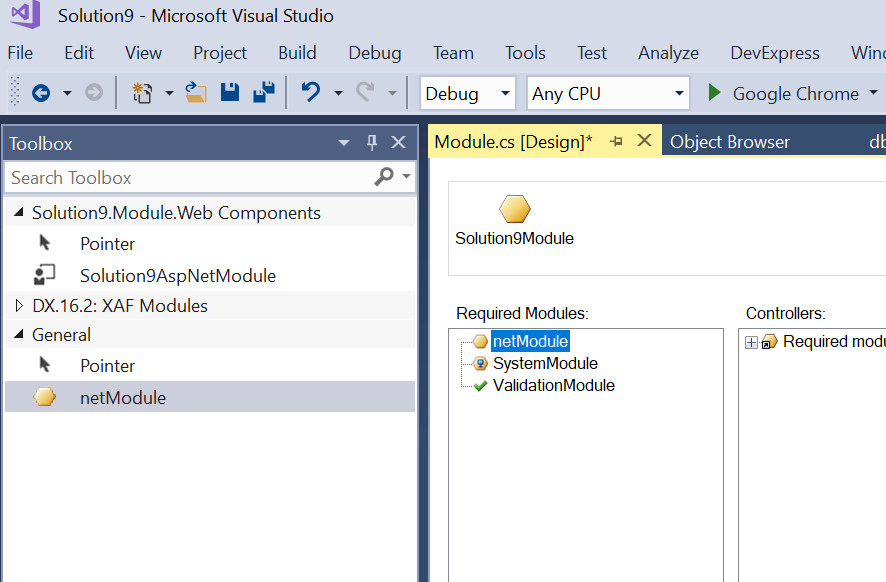
ToolBox tan netModule bileşeni Required Modules alanına sürüklenip bırakılır.

5. Adım : LogoCRM iş nesnesini kullanma

Oluşturduğumuz bir iş nesnesi içinden Logo CRM nesnelerini kullanabiliriz.

iş nesnesi oluştururken new item... dan DevExpress template gallery seçilerek ilerlenir. Açılan Arayüzden XAF tabından XPO Business object seçilmelidir.

6. Adım : Logo CRM Kullanıcı ve Rollerin Kullanılması

Authentication mekanizması seçili olduğu için aşağıdaki ekranda gözüken seçimlerin yapılması gerekir.

Bunun için;

  • WebApplication.cs dizay ekranı açılır.
  • Securit Strategy Complex seçilir.
  • Properties kısmında role ve user tipleri LogoCRM.CT_Role ve ST_User seçilir.

7. Adım : DBUpdate Sınıfının Düzenlenmesi

Burada override edilen metodlar kaldırılmalı. Logo CRM de kullanıcı ve rolleri ile ilgili işlemler yapıldığı için burada yapılması hataya sebep olacaktır.

8. Adım : Controller Eklenmesi

XAF Template Gallery kullanılarak XAF Controller dan View Controller Seçilir.

Controller
using System;
using System.Collections.Generic;
using System.Linq;
using System.Text;
using DevExpress.Data.Filtering;
using DevExpress.ExpressApp;
using DevExpress.ExpressApp.Actions;
using DevExpress.ExpressApp.Editors;
using DevExpress.ExpressApp.Layout;
using DevExpress.ExpressApp.Model.NodeGenerators;
using DevExpress.ExpressApp.SystemModule;
using DevExpress.ExpressApp.Templates;
using DevExpress.ExpressApp.Utils;
using DevExpress.Persistent.Base;
using DevExpress.Persistent.Validation;
using Solution10.Module.BusinessObjects;
using logocrm.net.Module.BusinessObjects;

namespace Solution10.Module.Controllers
{
    public partial class Sample_Controller : ViewController
    {
		private static bool subs = false;
        public Sample_Controller()
        {
            InitializeComponent();
        }
        protected override void OnActivated()
        {
			//Hedefe bağlı olarak çeşitli görevleri gerçekleştirir.
            base.OnActivated();
              if (!subs)
            {
                ObjectSpace.ObjectChanged += ObjectSpace_ObjectChanged;
                subs = true;
            }
        }

        private void ObjectSpace_ObjectChanged(object sender, ObjectChangedEventArgs e)
        {
            if (e.PropertyName == "Firma")
            {
                BO_Sample sample = ((BO_Sample)View.CurrentObject);
                if (e.NewValue != null)
                {
                    sample.Name = ((MT_Firm)e.NewValue).FirmTitle + "_"; 
                }
                else
                {
                    sample.Name = "";
                }
                
            }
        }

        protected override void OnViewControlsCreated()
        {
			// Hedef Görünüm kontrolüne erişir ve özelleştirir.
            base.OnViewControlsCreated();
        }
        protected override void OnDeactivated()
        {
           // Önceden abone olunan etkinliklerden çıkar ve diğer referansları ve kaynakları serbest bırakır.
              if (subs)
            {
                ObjectSpace.ObjectChanged -= ObjectSpace_ObjectChanged;
                subs = false;
            }
            base.OnDeactivated();
        }
    }
}

9. Adım : Business Object setter Getter 

Set/Get ve  ImmediatePostData eklentilerileri yapılır. Controller ve İş nesneleri bütünüyle sunucuda yönetilir.

ImmediatePostData  özelliği ile property değiştiği zaman sunucu tarafındaki kodların çalışmasını sağlar. 

Sample BO Setter Getter
        private MT_Firm firma;   
		[ImmediatePostData]
        public MT_Firm Firma
        {
            get
            {
                return firma;
            }
            set
            {
                SetPropertyValue("Firma", ref firma, value);
            }
        }
Sample BO
using System;
using System.Linq;
using System.Text;
using DevExpress.Xpo;
using DevExpress.ExpressApp;
using System.ComponentModel;
using DevExpress.ExpressApp.DC;
using DevExpress.Data.Filtering;
using DevExpress.Persistent.Base;
using System.Collections.Generic;
using DevExpress.ExpressApp.Model;
using DevExpress.Persistent.BaseImpl;
using DevExpress.Persistent.Validation;
using logocrm.net.Module.BusinessObjects;

namespace Solution10.Module.BusinessObjects
{


    [DefaultClassOptions]
    //[ImageName("BO_Contact")]
    //[DefaultProperty("DisplayMemberNameForLookupEditorsOfThisType")]
    //[DefaultListViewOptions(MasterDetailMode.ListViewOnly, false, NewItemRowPosition.None)]
    //[Persistent("DatabaseTableName")]
    // Specify more UI options using a declarative approach (https://documentation.devexpress.com/#eXpressAppFramework/CustomDocument112701).
    public class BO_Sample : BaseObject
    { // Inherit from a different class to provide a custom primary key, concurrency and deletion behavior, etc. (https://documentation.devexpress.com/eXpressAppFramework/CustomDocument113146.aspx).

        private string name;
        private MT_Firm firma;

        public BO_Sample(Session session)
            : base(session)
        {
        }

        public string Name { get => name; set => name = value; }

        [ImmediatePostData]
        public MT_Firm Firma
        {
            get
            {
                return firma;
            }
            set
            {
                SetPropertyValue("Firma", ref firma, value);
            }
        }

        public override void AfterConstruction()
        {
            base.AfterConstruction();
            // Place your initialization code here (https://documentation.devexpress.com/eXpressAppFramework/CustomDocument112834.aspx).
        }
        //private string _PersistentProperty;
        //[XafDisplayName("My display name"), ToolTip("My hint message")]
        //[ModelDefault("EditMask", "(000)-00"), Index(0), VisibleInListView(false)]
        //[Persistent("DatabaseColumnName"), RuleRequiredField(DefaultContexts.Save)]
        //public string PersistentProperty {
        //    get { return _PersistentProperty; }
        //    set { SetPropertyValue("PersistentProperty", ref _PersistentProperty, value); }
        //}

        //[Action(Caption = "My UI Action", ConfirmationMessage = "Are you sure?", ImageName = "Attention", AutoCommit = true)]
        //public void ActionMethod() {
        //    // Trigger a custom business logic for the current record in the UI (https://documentation.devexpress.com/eXpressAppFramework/CustomDocument112619.aspx).
        //    this.PersistentProperty = "Paid";
        //}
    }
}


10. Adım : Otomatik Deploy Tanımı


Sadece proje.Module çıktısı kullanılacaktır. Üretilen dll elle ya da aşağıdaki gibi otomatik olarak hedef dizine kopyalabilir.


Post Built Kod Örneği

xcopy /y $(ProjectDir)bin\release\$(SolutionName).Module.dll [Logo CRM Dizini]\bin Örneğin xcopy /y $(ProjectDir)bin\release\$(SolutionName).Module.dll C:\LogoCRM\bin xcopy /y $(ProjectDir)bin\debug\$(SolutionName).Module.dll C:\LogoCRM\bin xcopy /y $(ProjectDir)my_file.ini $(ProjectDir)$(OutDir)


Diğer makrolar için ...

11. Adım : Logo CRM de Uyarlama Modül Tanımı

dll adını logo CRM kök dizini altında web.config içinde appsetting altında Module values olarak kaydedilir.


web.config dosyasına uyarlama projesinin adı dll olmadan values alanına yazılmalı.

Örn: Proje.Module.dll için Proje.Module yazılmalı

<add key="Modules" value="Proje.Module" />


crm web.config

<appSettings> <add key="Modules" value="....." /> <add key="ErrorReportEmail" value="" /> <add key="ErrorReportEmailServer" value="" /> <add key="SimpleErrorReportPage" value="" /> <add key="RichErrorReportPage" value="Error.aspx" /> <add key="EnableDiagnosticActions" value="False" /> <add key="Languages" value="en-US;tr-TR" /> </appSettings>

Proje.Module  build  alınır LogoCrm\bin dizini altına dll otomatik ya da elle kopyalanır.

12. Adım : Logo CRM Model Editör

Ürün Model Editöründen Uyarlama Ekranları Navigation bölümünde tanımlanmalı.

ModelEditör klasöründeki ModelEditor.bat dosyası çalıştırılmalı. 

ListView ler Logo CRM navigation'a eklenir.

NavigationItems altında Items üzerinde Add/NavigationItem diyerek yeni bir NavigationItem eklenir.


View alanında oluşturduğumuz BusinessObject'in ListView'i seçilir.

13. Adım : IIS Tekrar Başlatma

Uyarlamanın Logo CRM de görebilmeniz için IIS ten restart yapmanız gerekir.


14. Adım : Logo CRM Login

Aşağıdaki gibi ilk uyarlama projemizi Logo CRM uygulaması içerisinde görebiliriz.